
Introduction to Amazon Elastic Beanstalk
The Amazon Elastic Beanstalk service aims to solve a few issues that developers encounter on a semi-regular basis. The reality of application development, and deployment is that in many instances, the architecture required to run those applications and services is the same, or nearly the same. In other words, there’s an opportunity to create a template for deploying applications by following the same principles and infrastructure components - Ex: load balancers, instances, databases, storage containers, etc. Elastic Beanstalk is the service that allows developers to create infrastructure services at scale by automating the creation fo underlying service via simple configuration.
Remember that developers aren’t interested in how the infrastructure is delivered; their main concern is with writing code that runs!
The Pricing Model for Elastic Beanstalk
It’s important to note that the Amazon Elastic Beanstalk service is free of charge. However, the underlying infrastructure it will deploy will be billed at the same rate as it if was provisioned individually. In other words, you won’t be paying for the capability to orchestrate the deployment of the services, but you will be paying for the services (Ex - EC2, ELB, RDS, ASG, etc.) as you would if you deployed them individually. Therefore, it’s important to set the proper settings when deploying Beanstalk.
Amazon Elastic Beanstalk Support Platforms / Environments
It’s important to understand that developers may use Beanstalk for a variety of applications and use cases. Furthermore, each deployment is specific to the language, use case, and platform. It is therefore important to provide a variety of platforms on AWS that integrate with Beanstalk and accommodate developers of all needs. Here’s the current list of platforms supported on Amazon Beanstalk:
- Docker - Single Container deployments
- Docker - Multi-Container deployments
- Go
- Java SE
- Tomcat
- .NET Code on Linux
- .NET on Windows Server
- Node.js
- PHP
- Python
- Ruby
Hands on With AWS Beanstalk
In this section, we’ll explore AWS Beanstalk via a hands-on approach.
Step 1 - Navigate to the Amazon Elastic Beanstalk Console & Create New Application
1.1 - From the AWS Console, search for “elastic beanstalk.”
1.2 - From the drop-down menu, click on “CloudFront.”
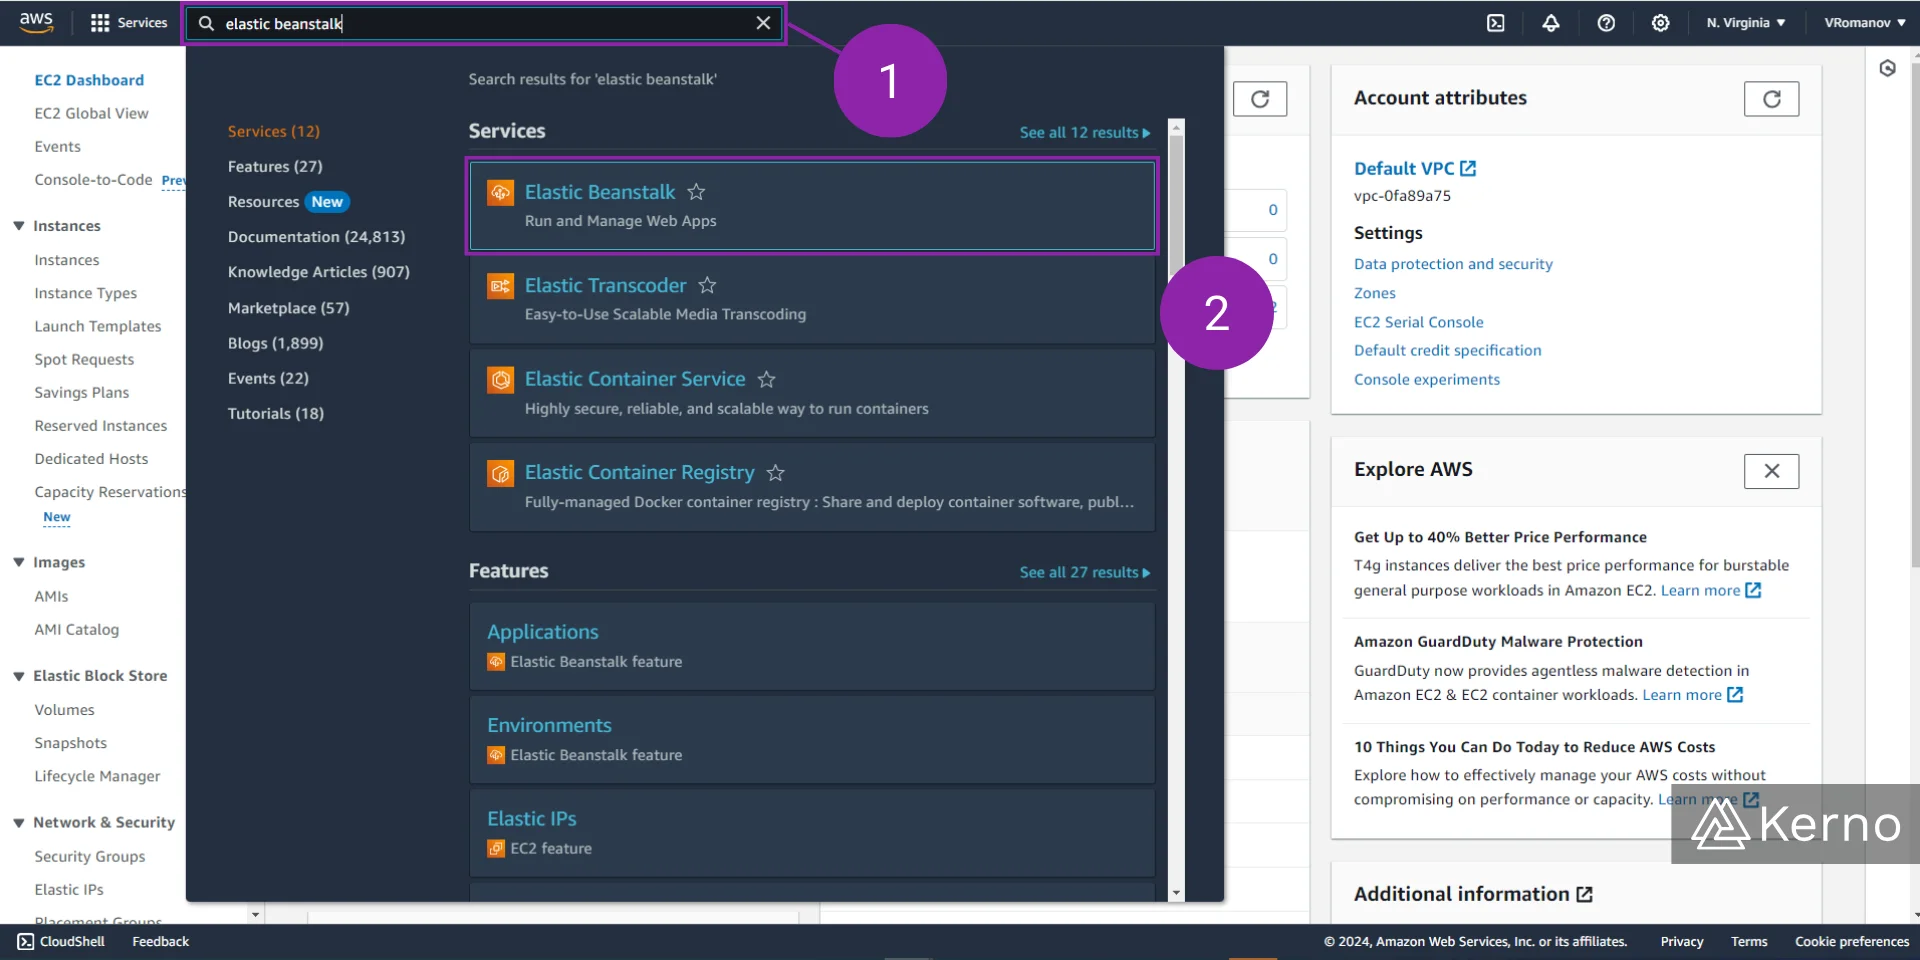
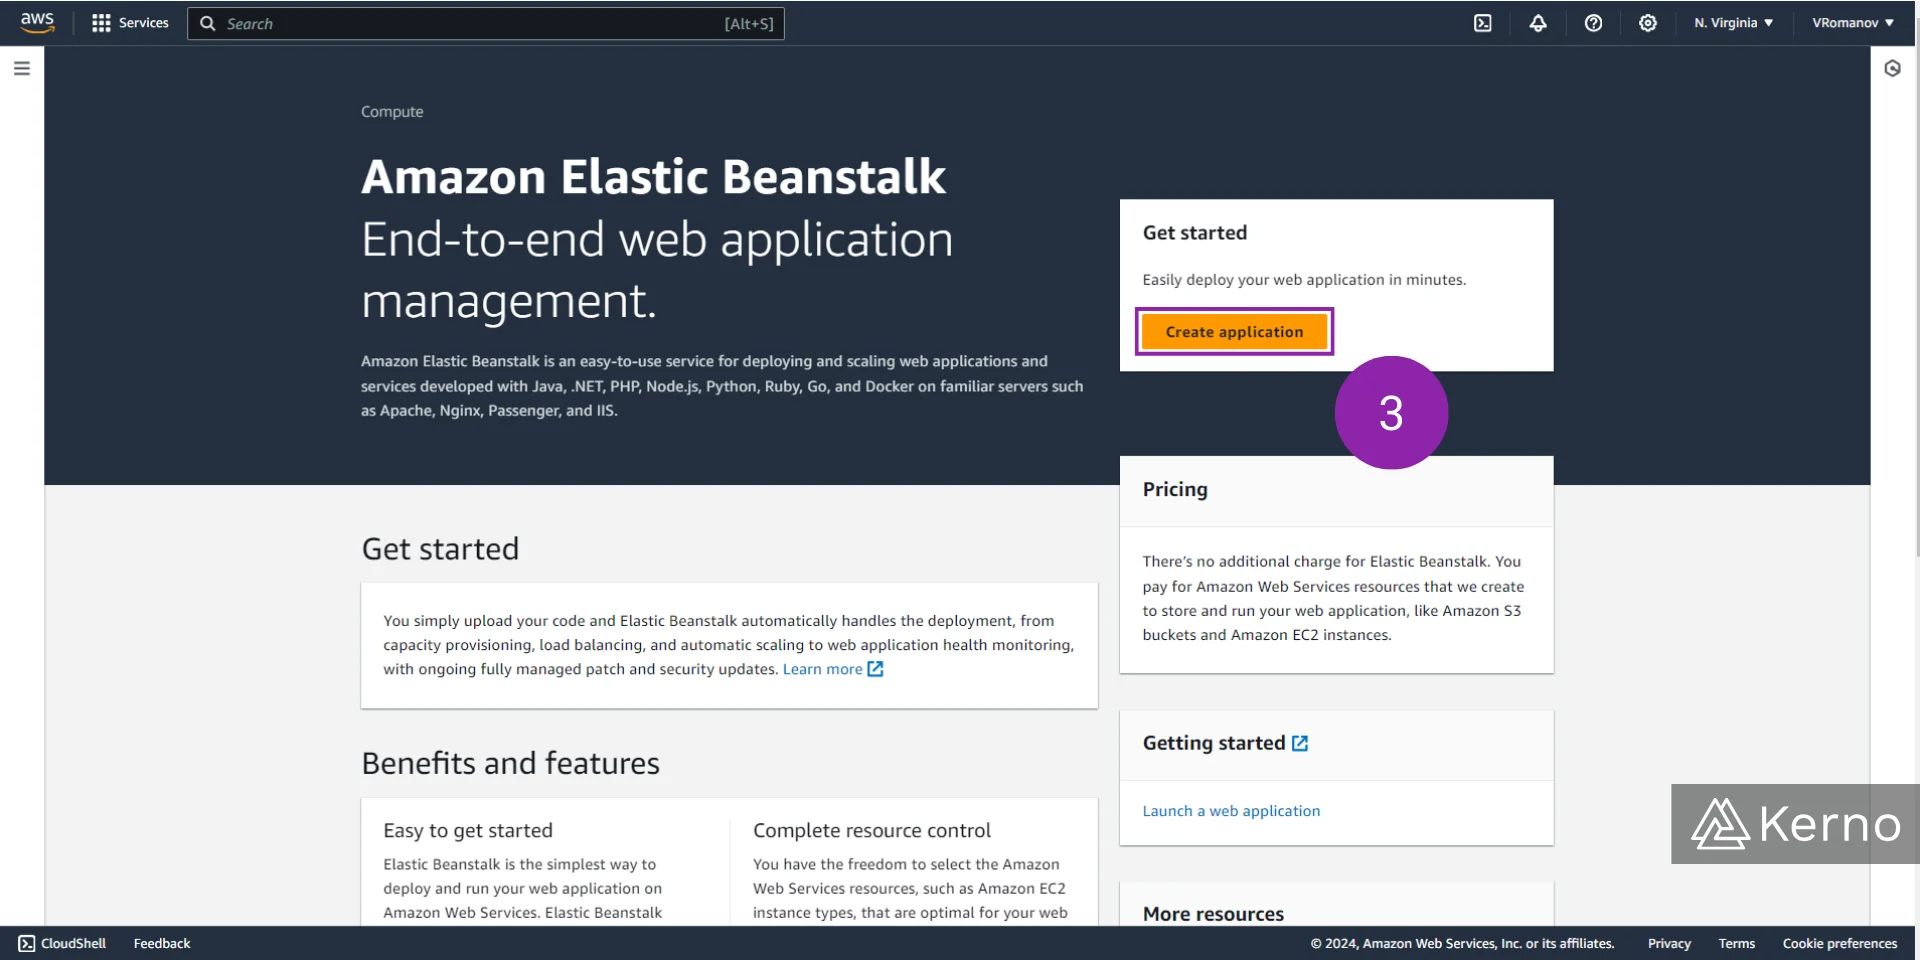
1.3 - From the Amazon Elastic Beanstalk Console, click on “Create application.”
Step 2 - Configure the Elastic Beanstalk Environment [Part 1 / 2]
2.1 - From the Environment tier menu, choose “Web server environment.” Remember that Elastic Beanstalk can provide infrastructure in one of two options: a web server environment or a worker environment. They both provide a different architecture and approach to deploying applications. Review the details presented earlier in this post.
2.2 - Give your application a name; for this example we’ve used “KernoApp1.”
2.3 - You can choose to obtain an autogenerated domain or to specify your own; for this example, we’ve chosen to get the autogenerated domain.

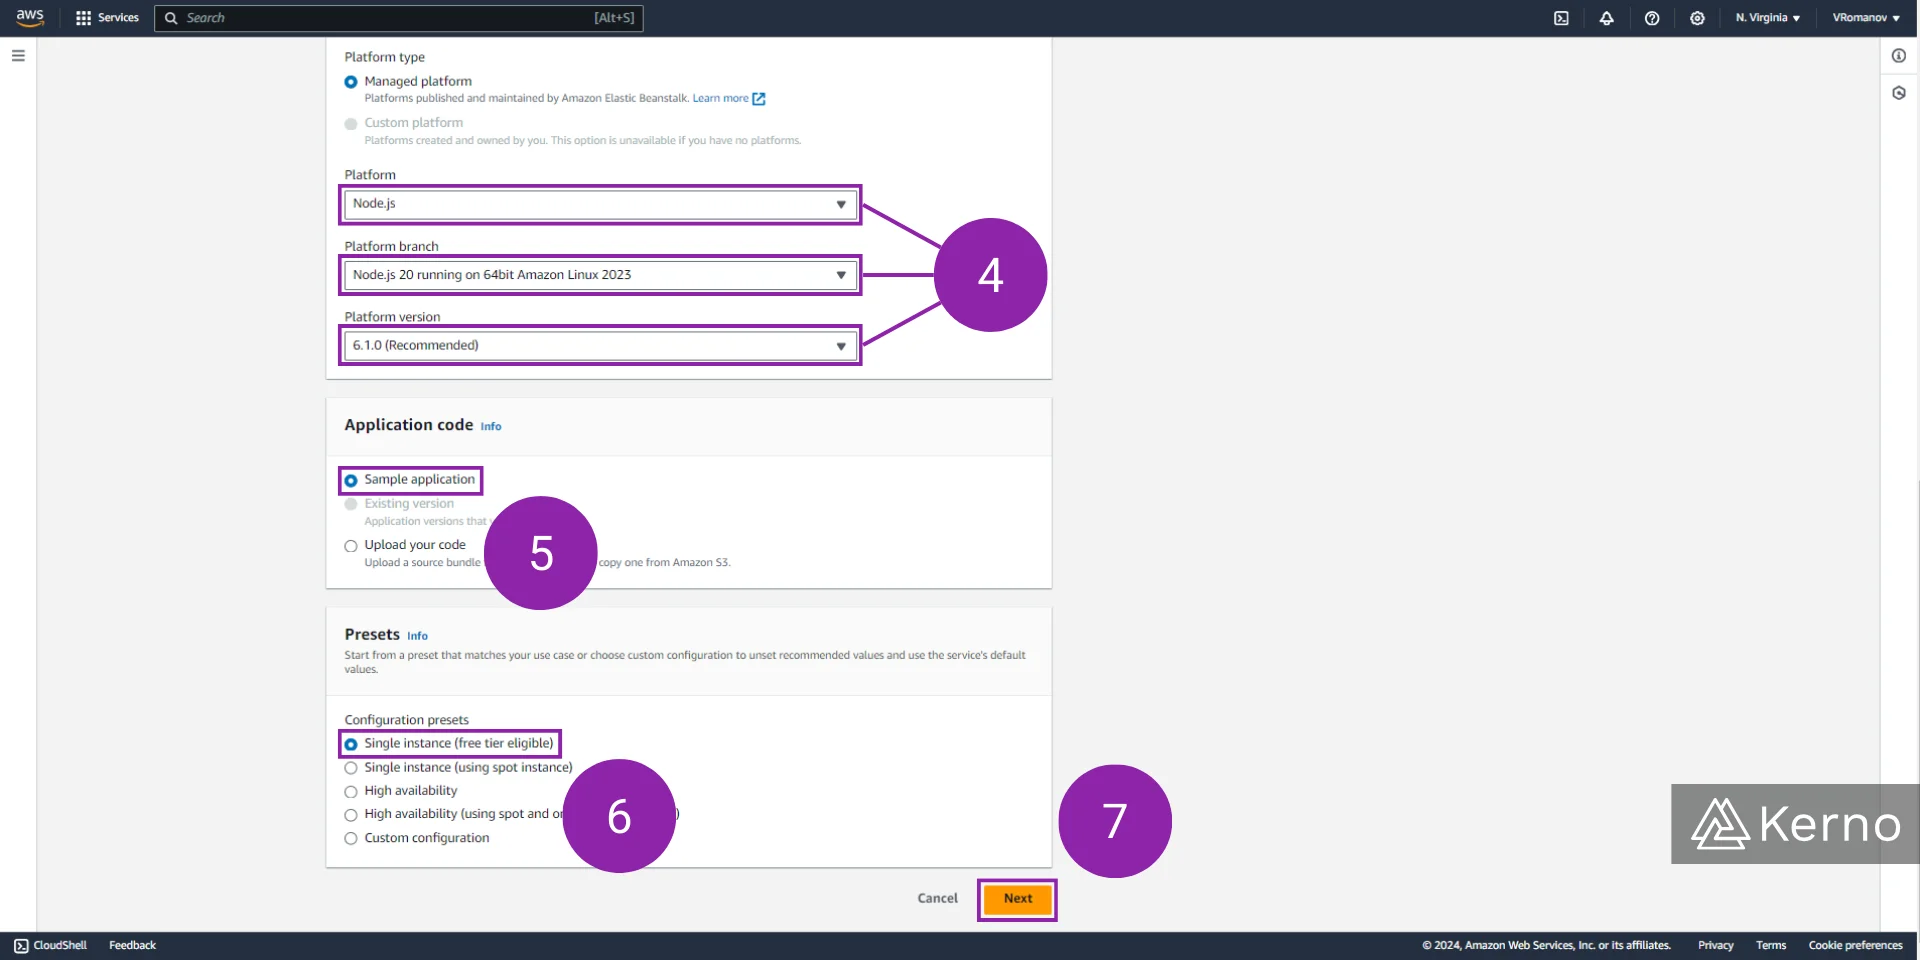
2.4 - In this tutorial, we’re going to deploy a Node.js application onto the infrastructure we’re deploying. Therefore, select “Node.js,” “v20,” and “6.1.0.” Note that you may have different versions if they’ve chance since the release date of this tutorial.
2.5 - You can choose to upload the code of your application, or to test the architecture using a sample application. Select “Sample application” for this exercise.
2.6 - We will be configuring the instances upon which the application will be deployed in the following steps. At this moment, you can choose a preset for the deployment. In this example, to keep the costs low, we’re going to select “Single instance.”
2.7 - Press on “Next” at the bottom of the page.
2.8 - At this point, we need to configure IAM access for the users that will be using the architecture deployed by Amazon Elastic Beanstalk.
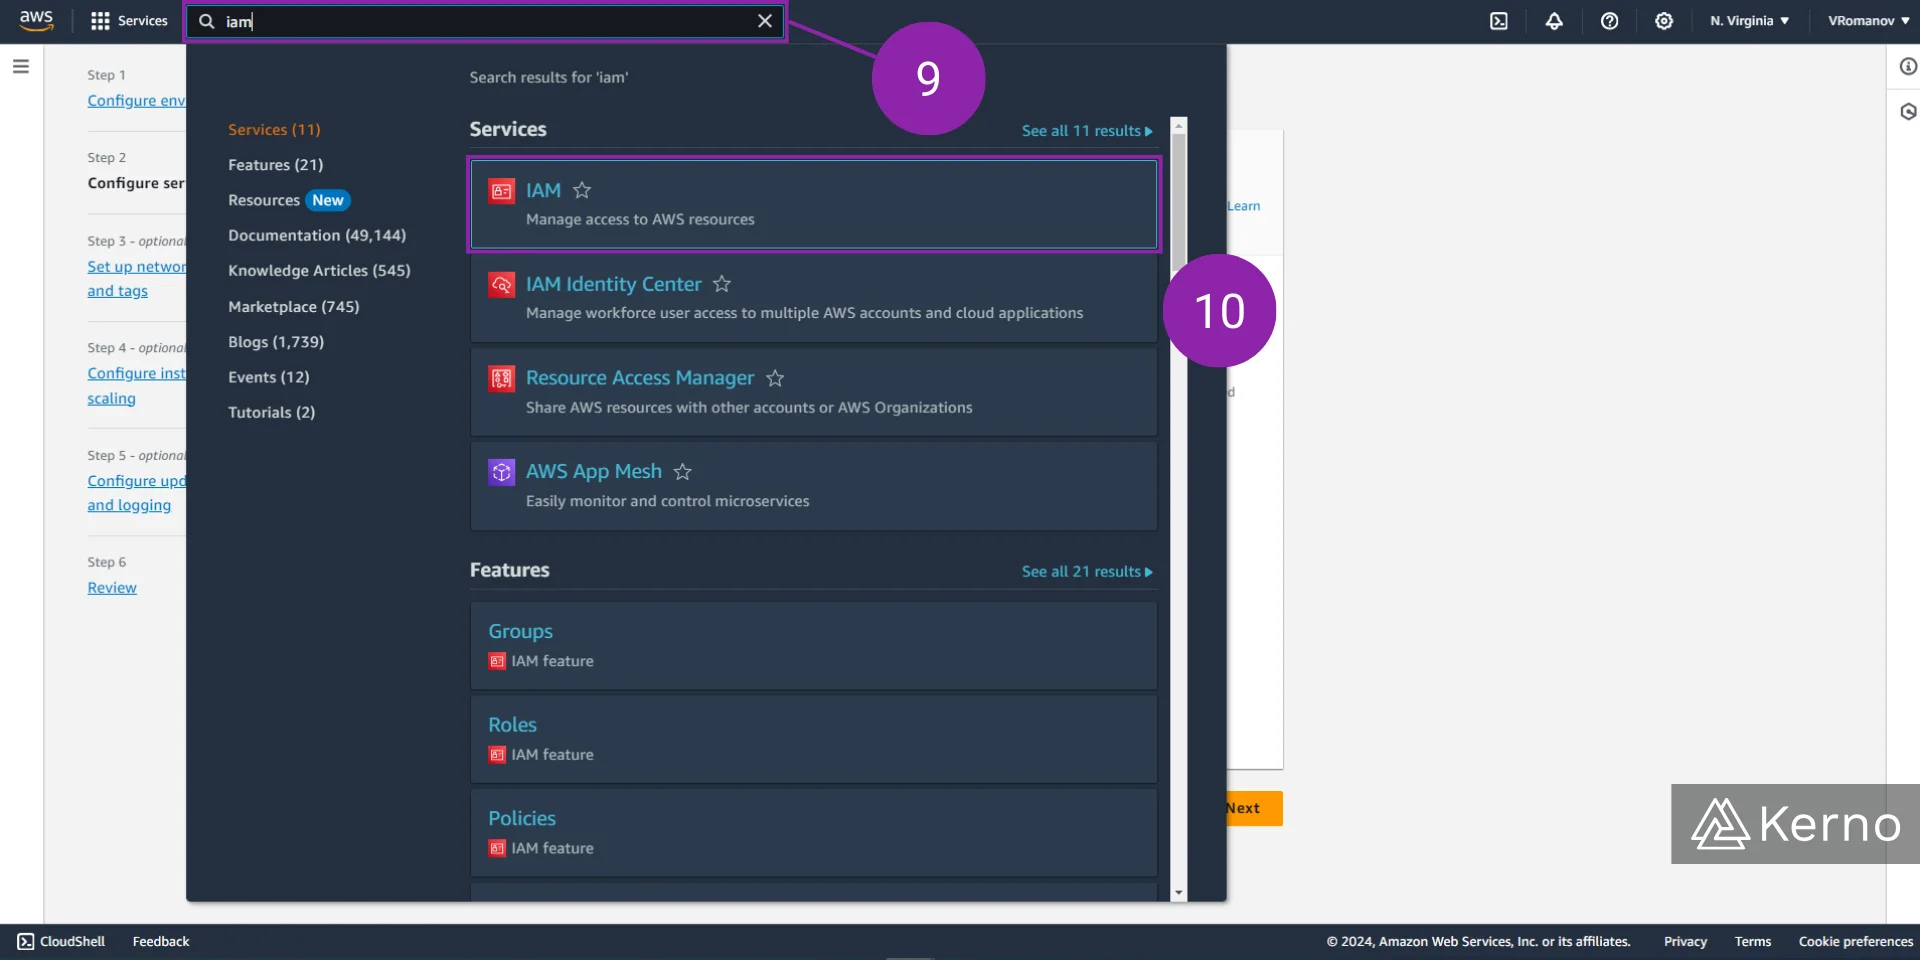
2.9 - Select the search bar at the top of the page and type in “iam.”
2.10 - Click on “IAM” to navigate to the console, which will allow us to create the users and permissions we need to configure. Note that you can keep the settings we’re configured by opening the IAM console on a new page.
2.11 - Navigate to the “Roles” menu by clicking the button in the left navigation menu.
2.12 - Select “Create role” to begin the process of adding a new role.

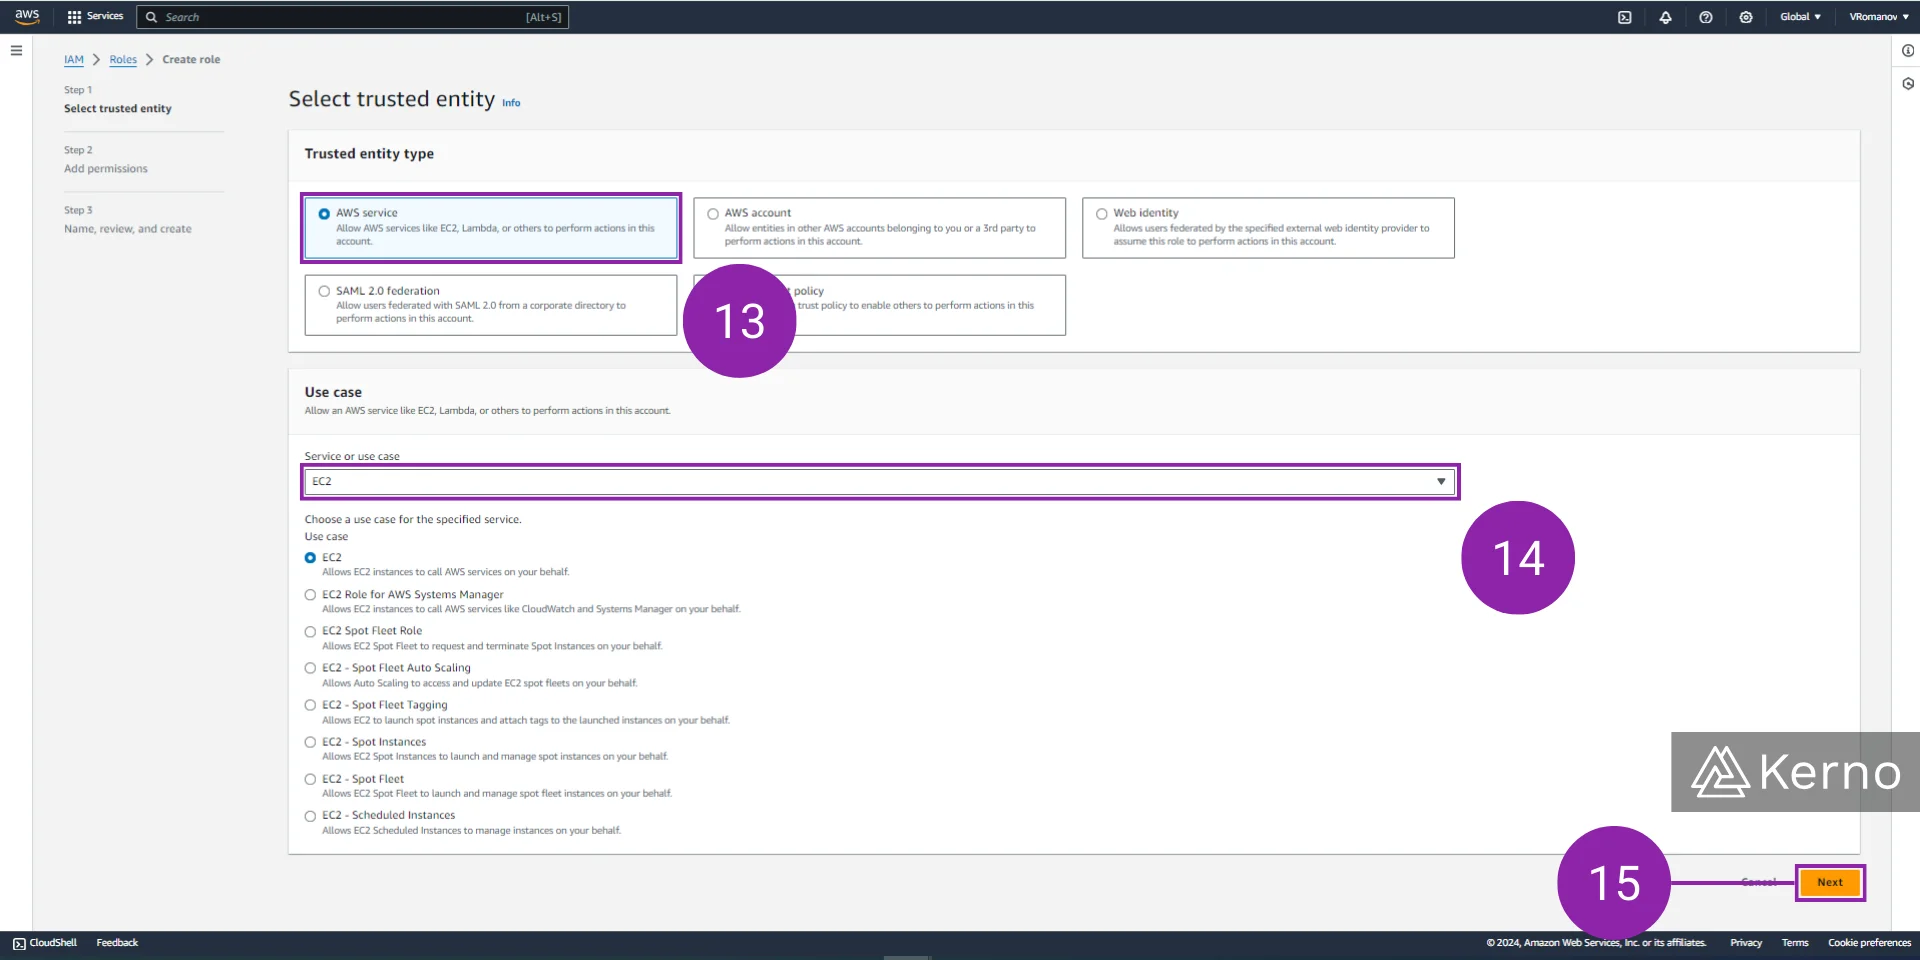
2.13 - Select “AWS service” from the list of Trusted entity types.
2.14 - We’re creating these permissions for EC2 - Select “EC2” from the dropdown list under “Use case.”
2.15 - Press on “Next” at the bottom of the page.
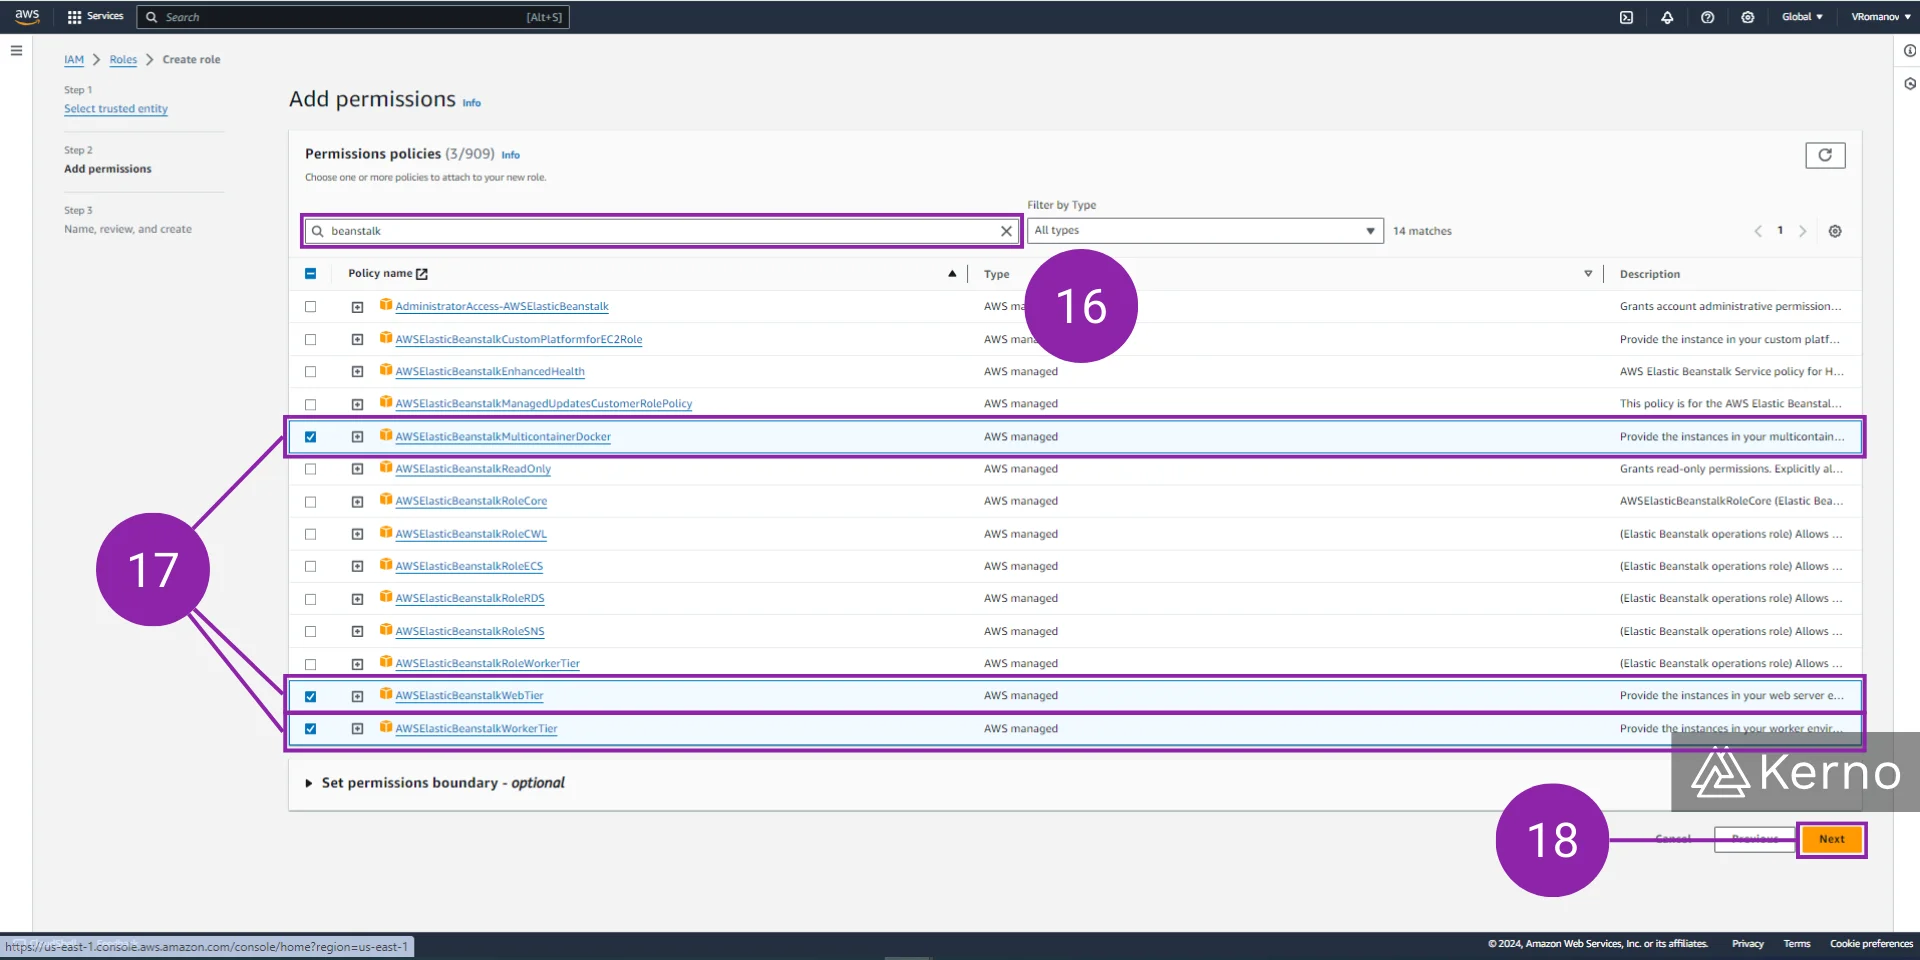
2.16 - We need to filter for the permissions related to Amazon Elastic Beanstalk; search for “beanstalk” to see the filtered list.
2.17 - Choose the three policies that matter in this example - AWSElasticBeanstalkWebTier, AWSElasticBeanstalkWorkerTier, AWSElasticBeanstalkMulticontainerDocker.
2.18 - Press on “Next” at the bottom of the page.
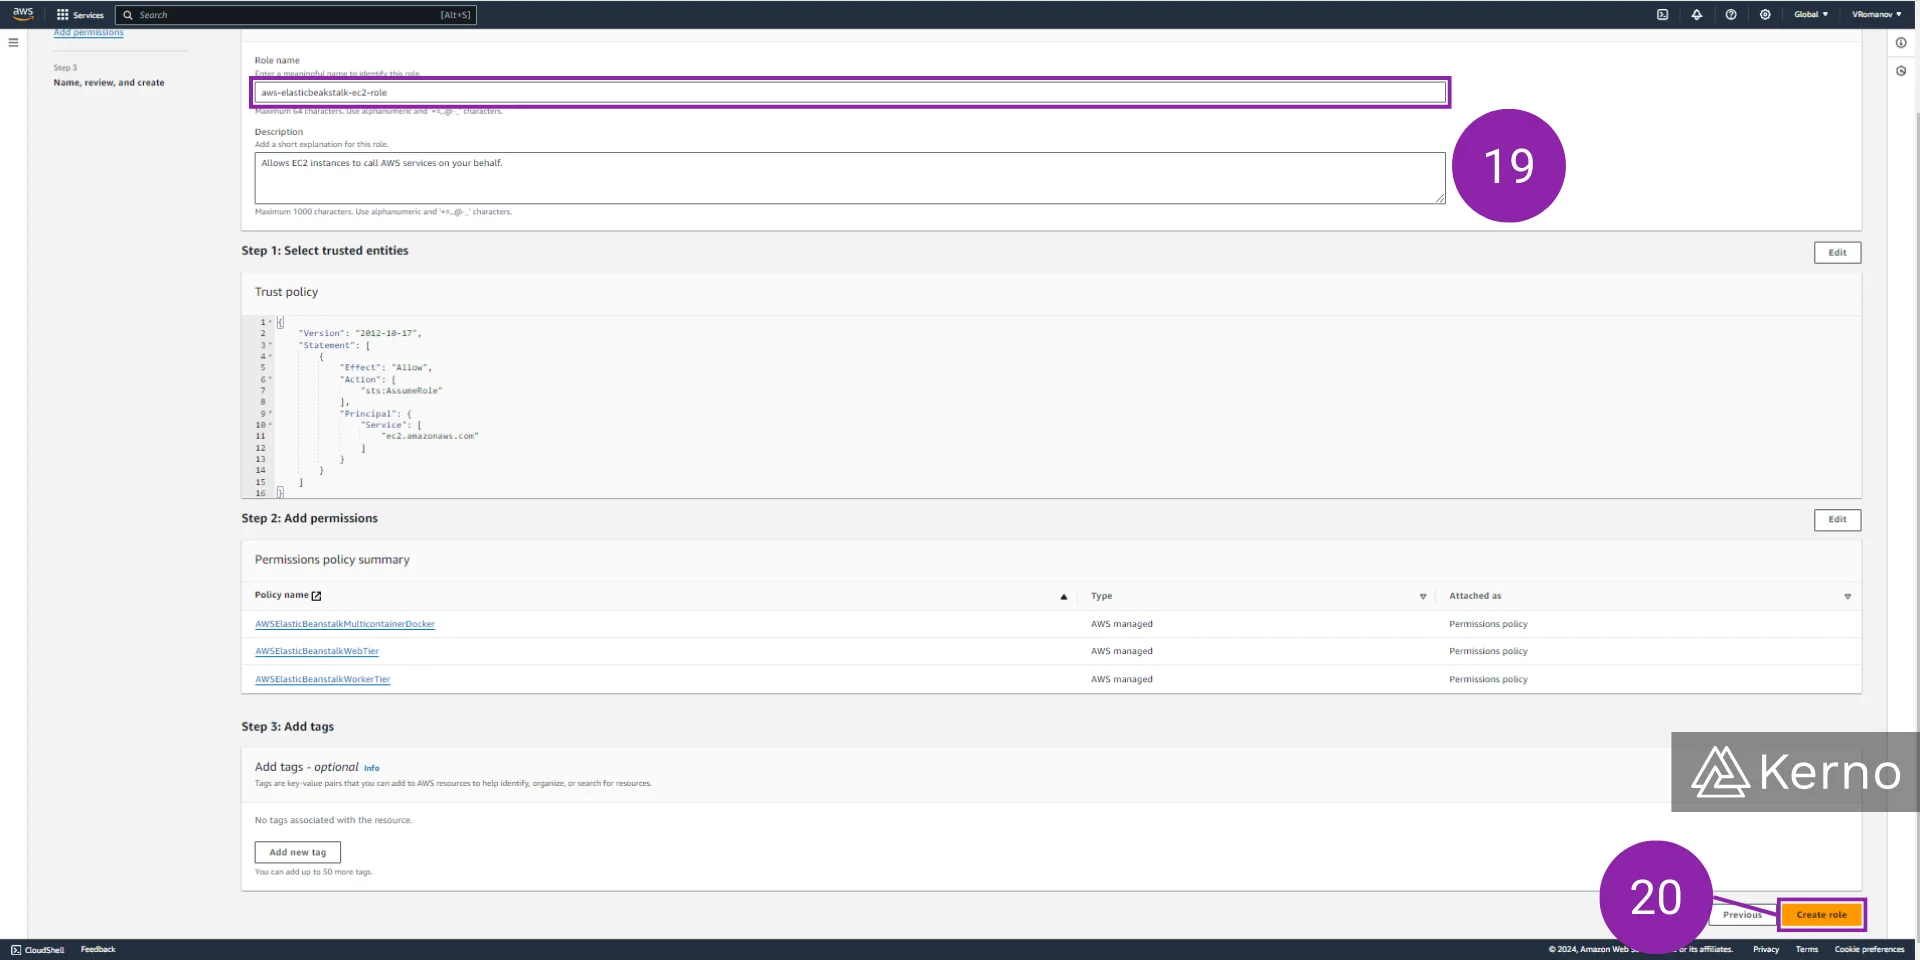
2.19 - Enter the name of the role - “aws-elasticbeakstalk-ec2-role.”
2.20 - Click on “Create role” at the bottom of the page.
Step 3 - Configure the Elastic Beanstalk Environment [Part 2 / 2]
At this point, we can go back into the Amazon Elastic Beanstalk configuration and continue to configure the settings.
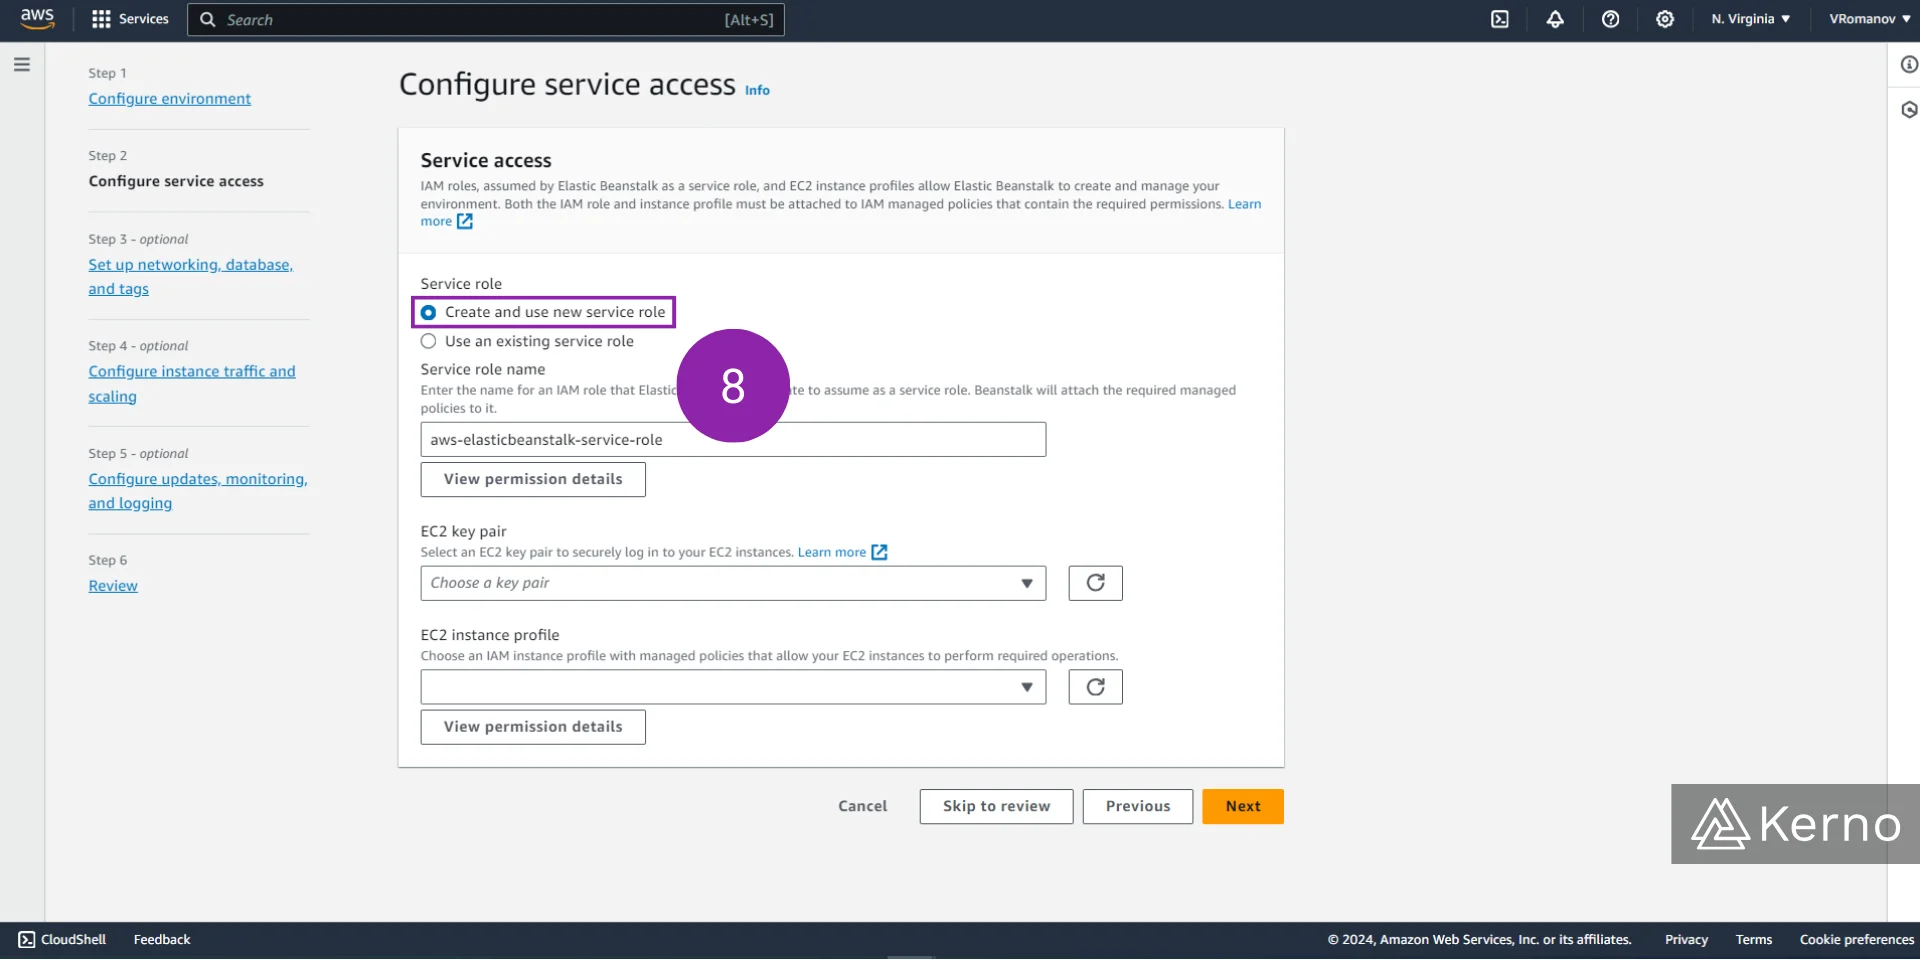
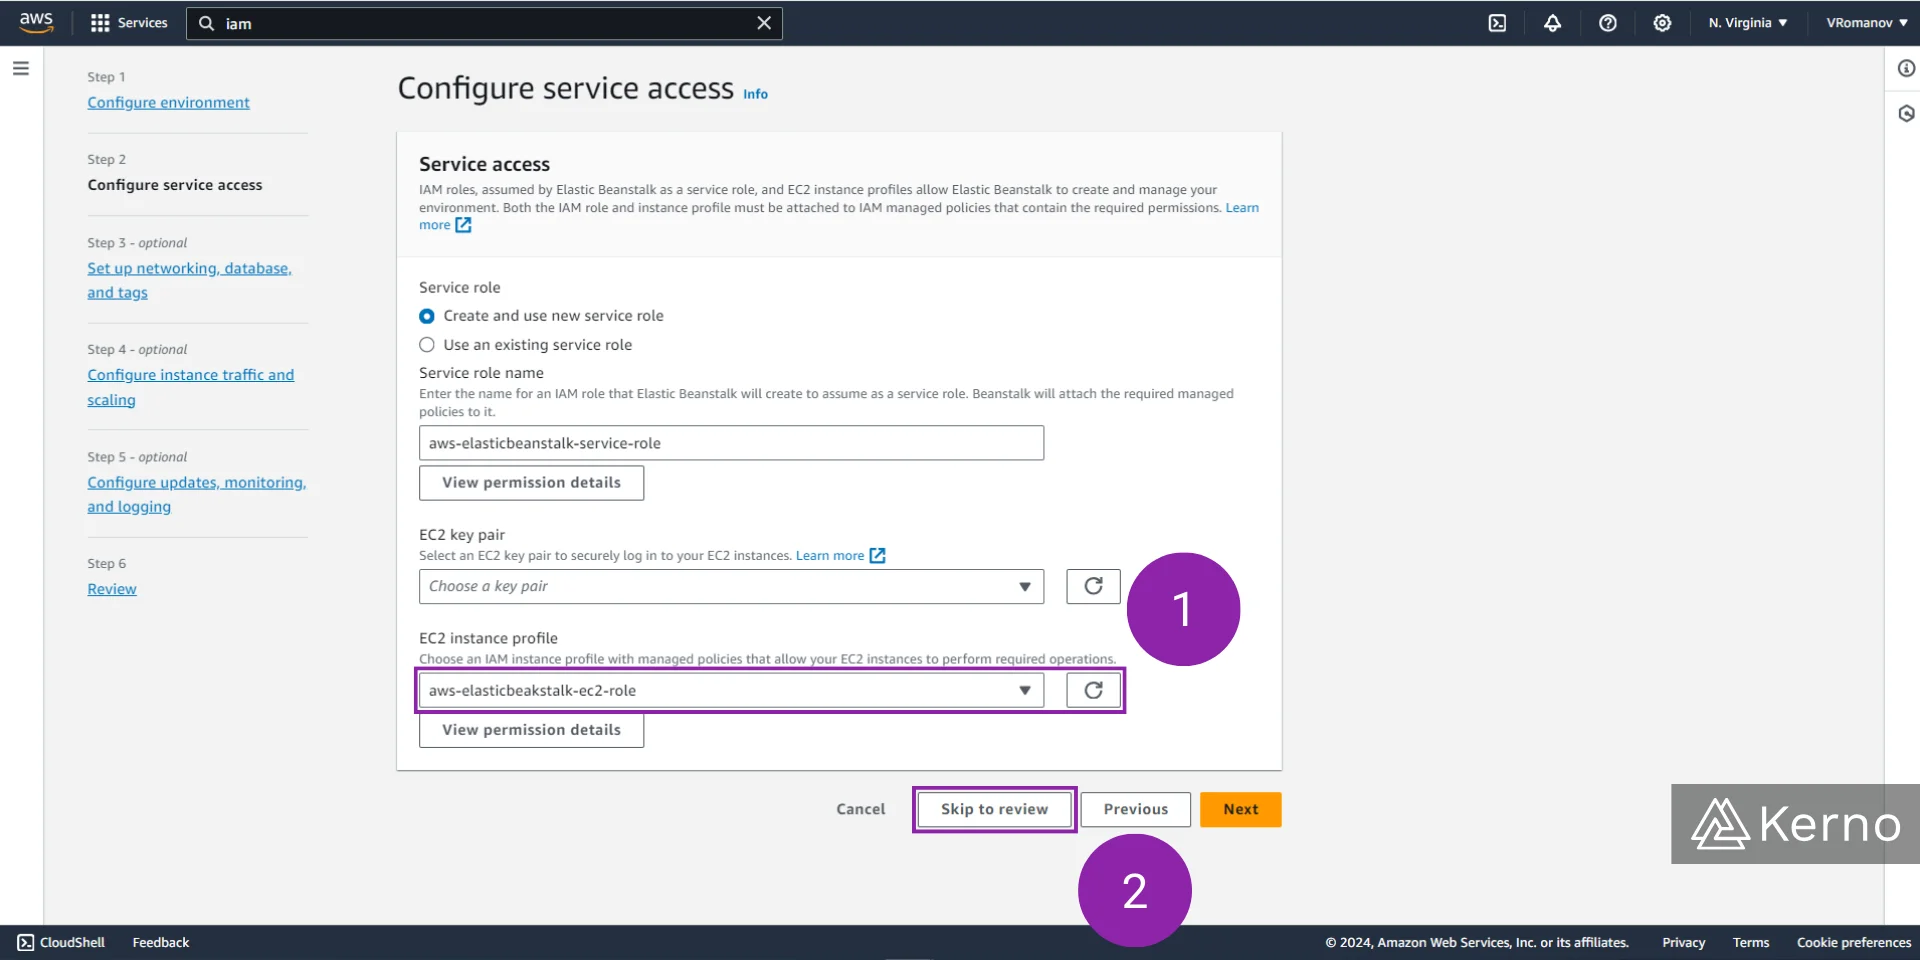
3.1 - In the Service access page, you can now enter the name of the instance profile we created in the previous steps. Use “aws-elasticbeakstalk-ec2-role” or the name you chose in your case.
3.2 - We can choose to configure a variety of other options. However, those configurations are optional; we can accept the defaults by pressing the “Skip to review” button.
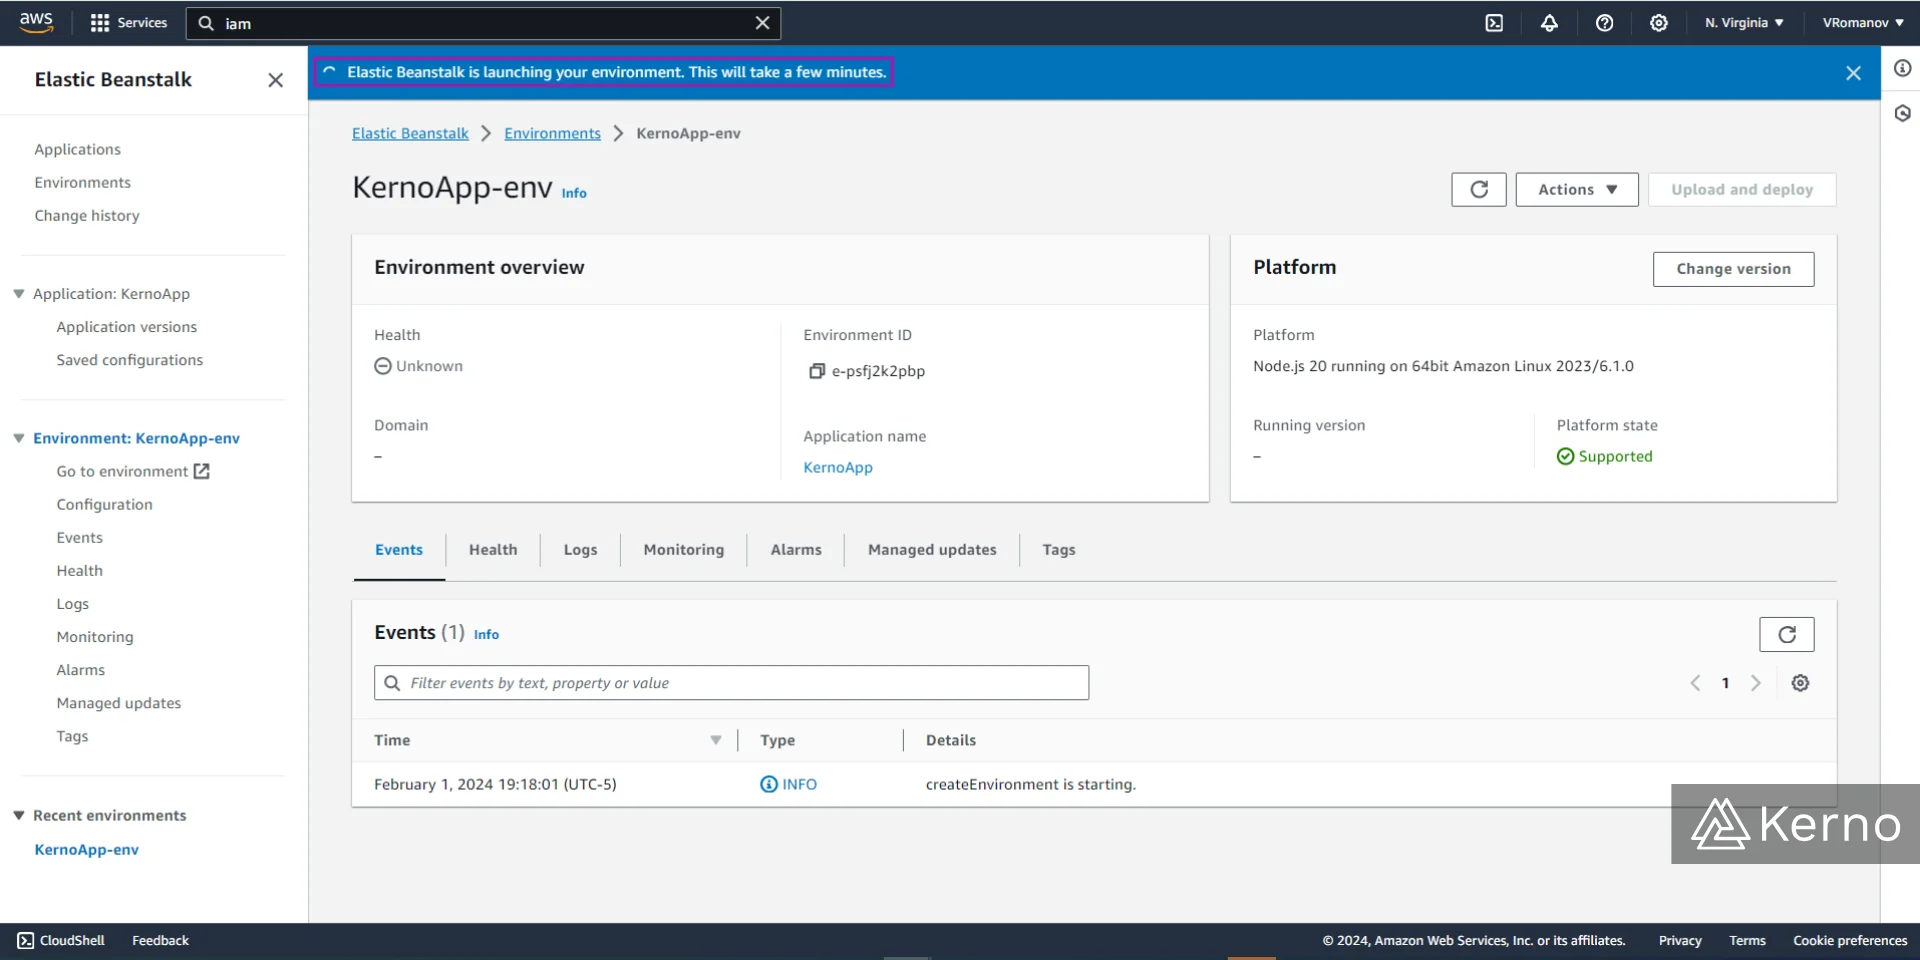
At this point, you should receive a confirmation that the Elastic Beanstalk is launching the environment we’ve specified.
CloudFormation Events for Amazon Elastic Beanstalk
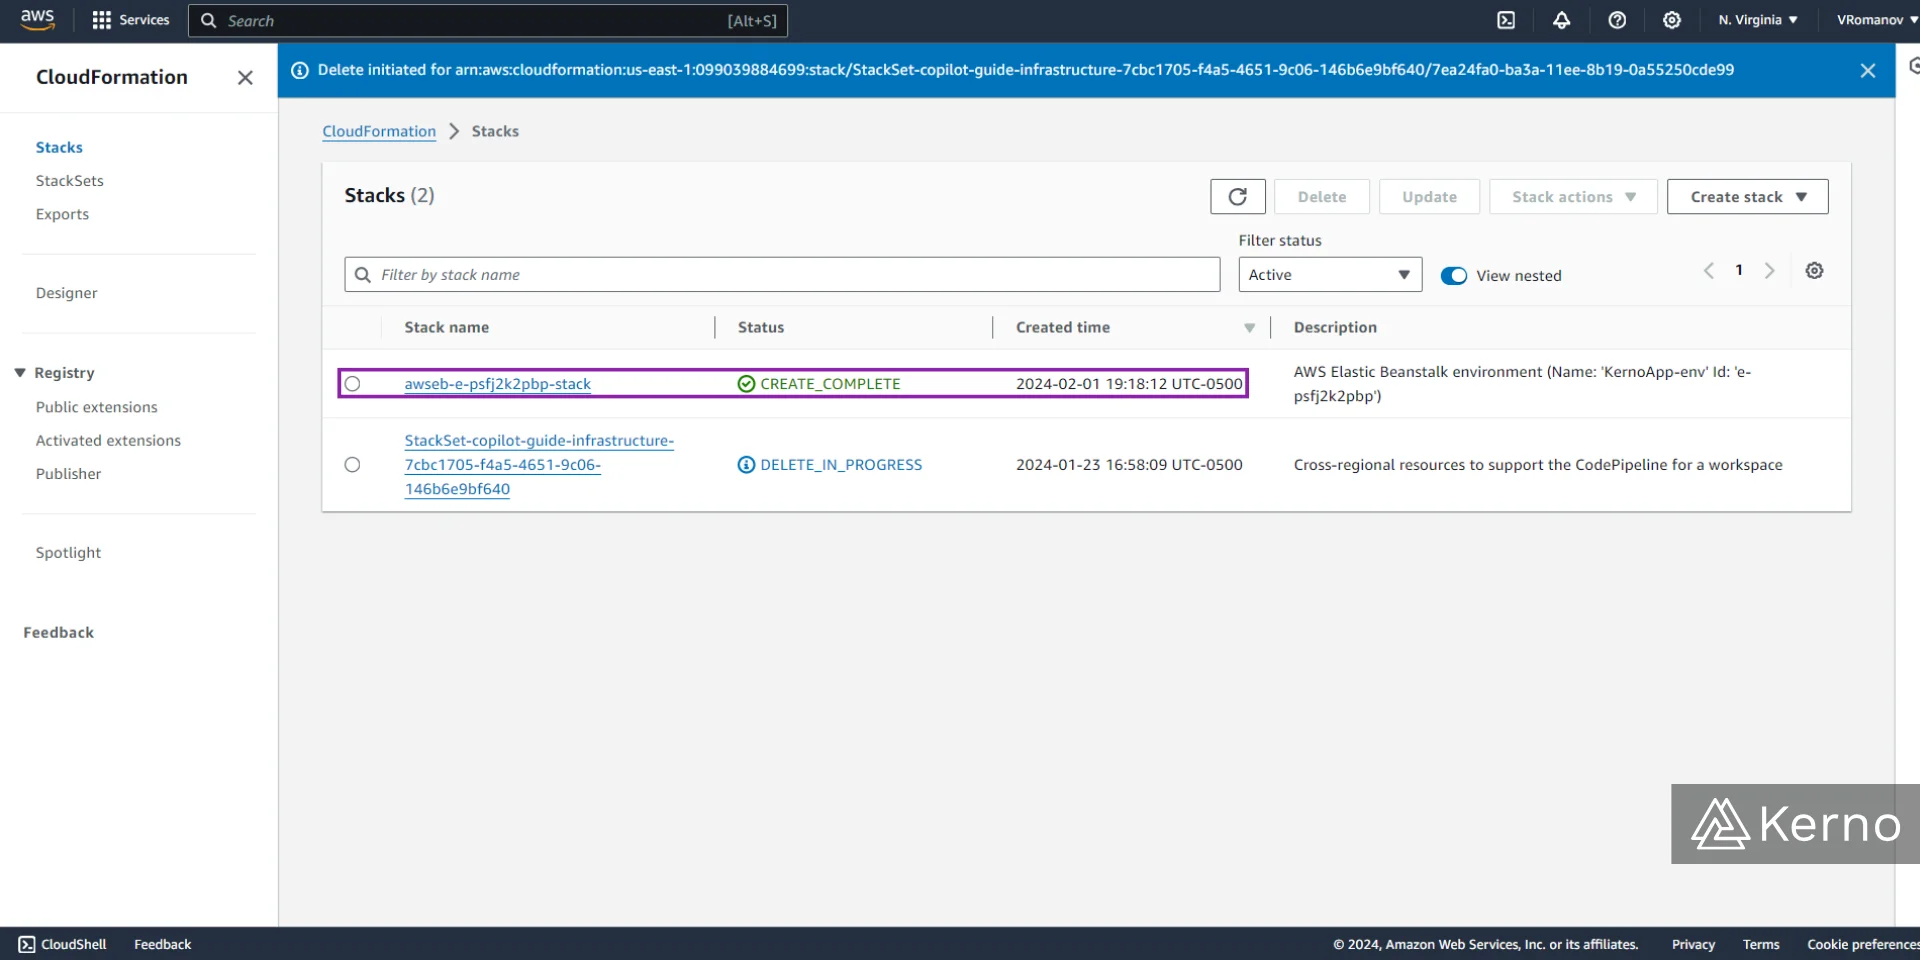
AWS CloudFormation is a service that deploys “stacks” as we just specified via the Amazon Elastic Beanstalk. If you need to see what the current deployment status is of a stack, to monitor the components of a specific stack, or to issue commands to a specific stack, you can do so by navigating to the AWS CloudFormation console and selecting the desired stack.
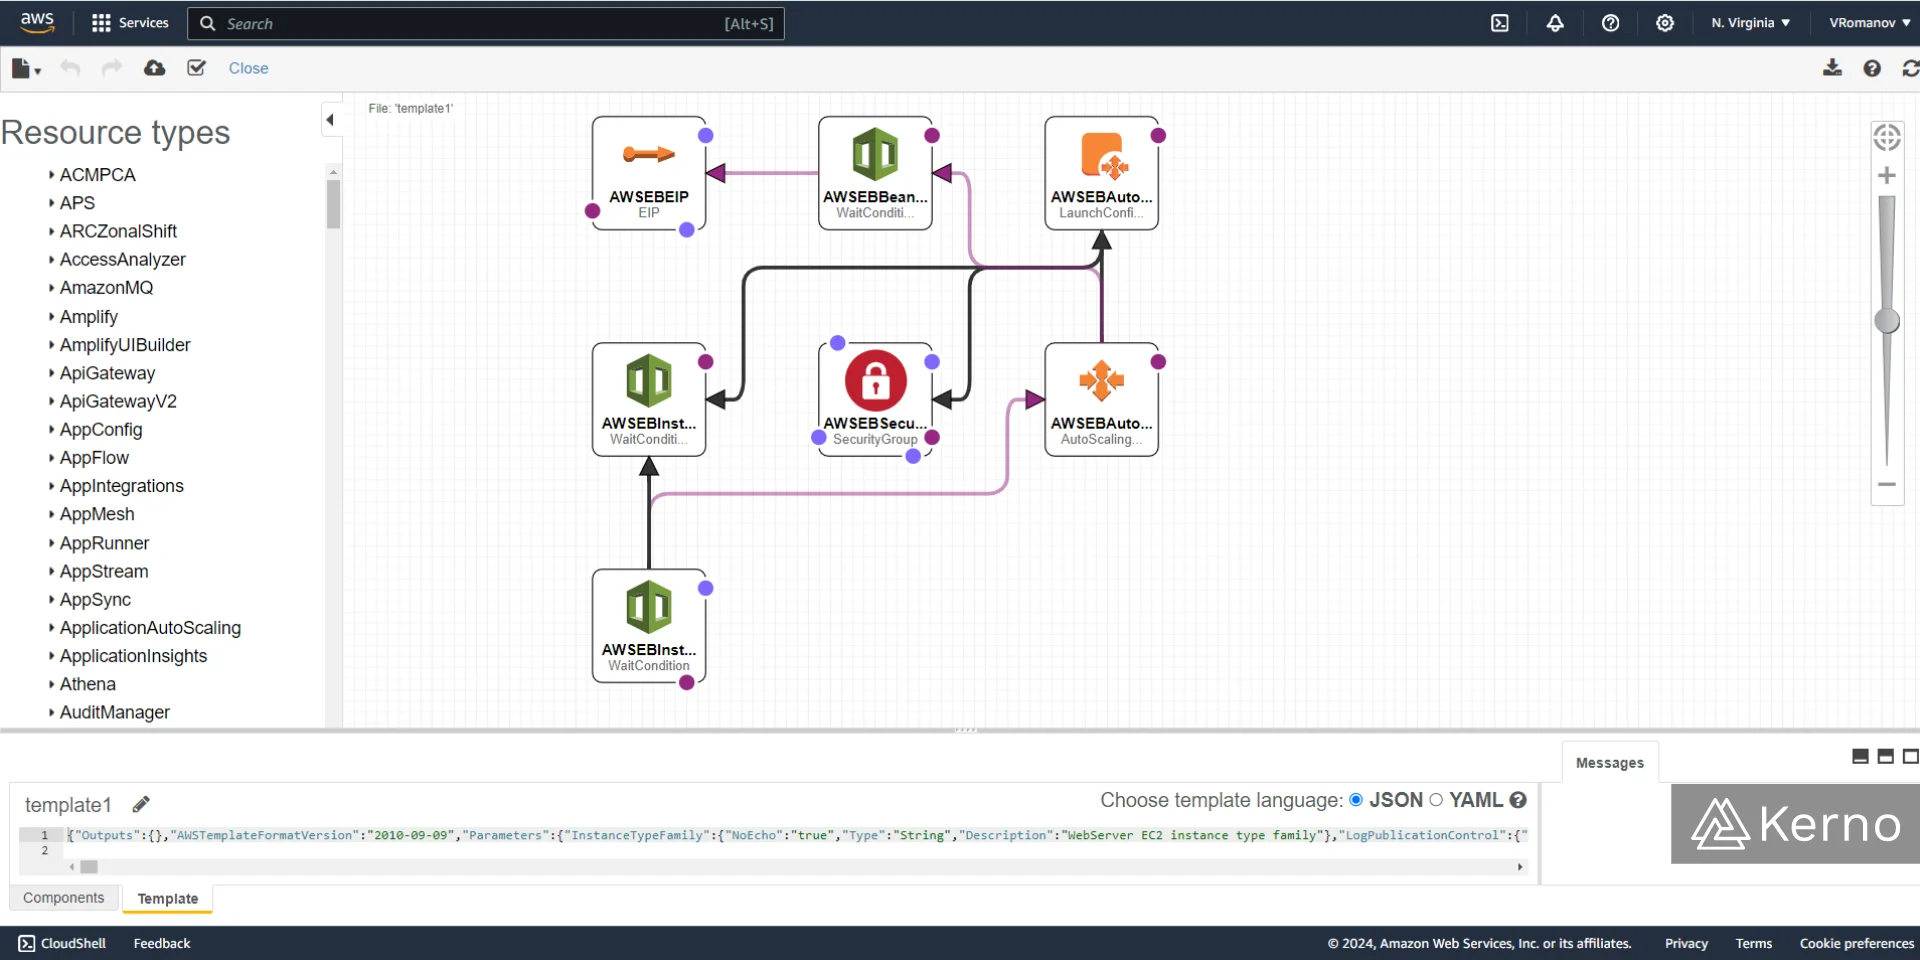
Under the “Templates” section of a stack in CloudFormation, the user can choose to view a graphic representation of the services that have been deployed as a result of what we’ve specified in the Elastic Beanstalk configuration. The resulting graphical representation can be seen below in which a variety of AWS services have been deployed and configured to interact with each other.
Acessing the Deployed Node.js Application via Amazon Elastic Beanstalk
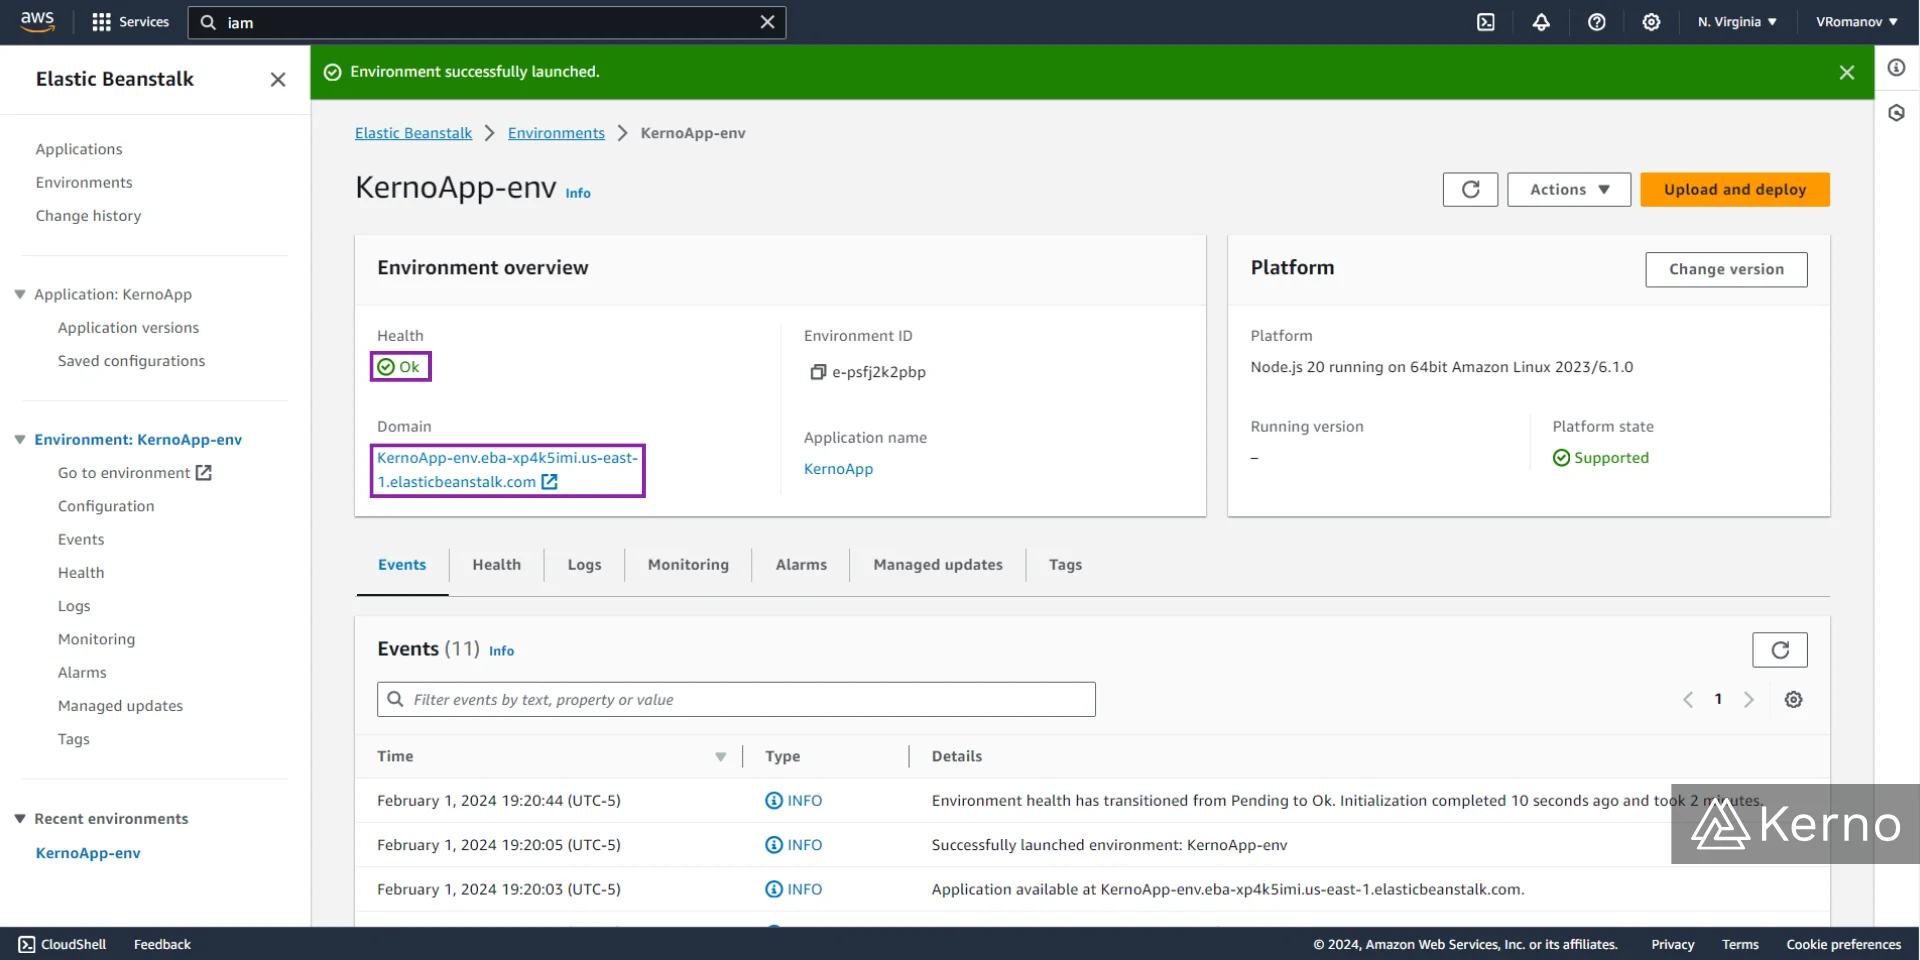
At this point, we’ve deployed a demo application via the steps listed above. If you navigate to the Elastic Beanstak environments, and select the environment we’ve just deployed, you should see an “Ok” notification.
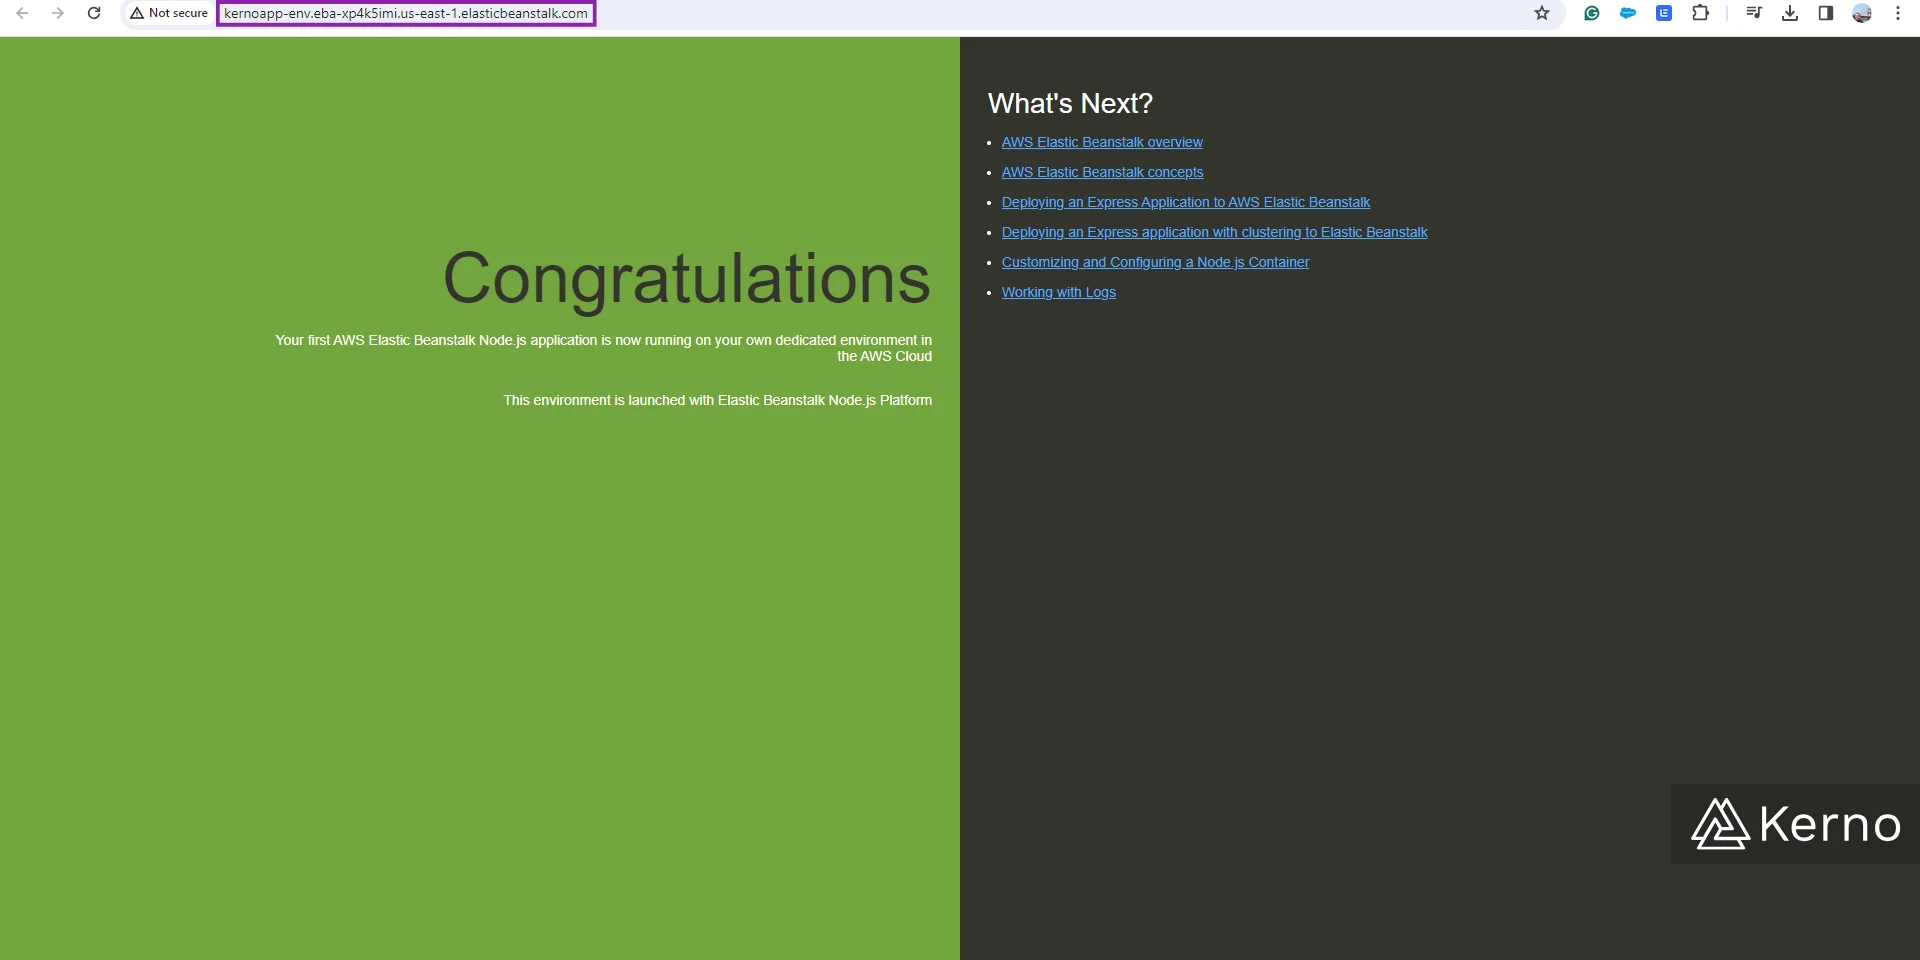
Click on the Domain URL and you should be redirected to the application homepage.
Conclusion on Amazon Elastic Beanstalk
As we saw in the hands-on section of this guide, Amazon Elastic Beanstalk is a simplified approach to creating infrastructure required to run a variety of applications without the need to provision each infrastructure component manually. The Beanstalk solution is aimed at engineers that are focused on coding and simply need their code to be put in front of their users efficiently through modern software best practices that include load balancing, proper traffic management, instance, storage, and more.