
What is AWS AMI?
Amazon Machine Images are custom EC2 Instances that offer repeatability and fast deployment of underlying software. The goal of an AMI is to create a “snapshot” of an EC2 instance and allow duplication and easy deployment of this asset as needed.
Prerequisites
To follow along with this tutorial, you will need:
- A basic understanding of AWS EC2 instances.
- A basic understanding of AWS EBS volumes.
- An active EC2 instance.
What are the Types of AWS AMIs?
Two options are available to every AWS user when it comes to AMIs:
Option 1 - Public AWS AMIs
AWS has created an AMI marketplace that provides a listing of thousands of different AMIs created by 3rd party vendors. These images can be easily deployed on an EC2 instance. The vendors provide extensive documentation of their AMI through the marketplace - how to deploy, what software it contains, what the costs are, etc.
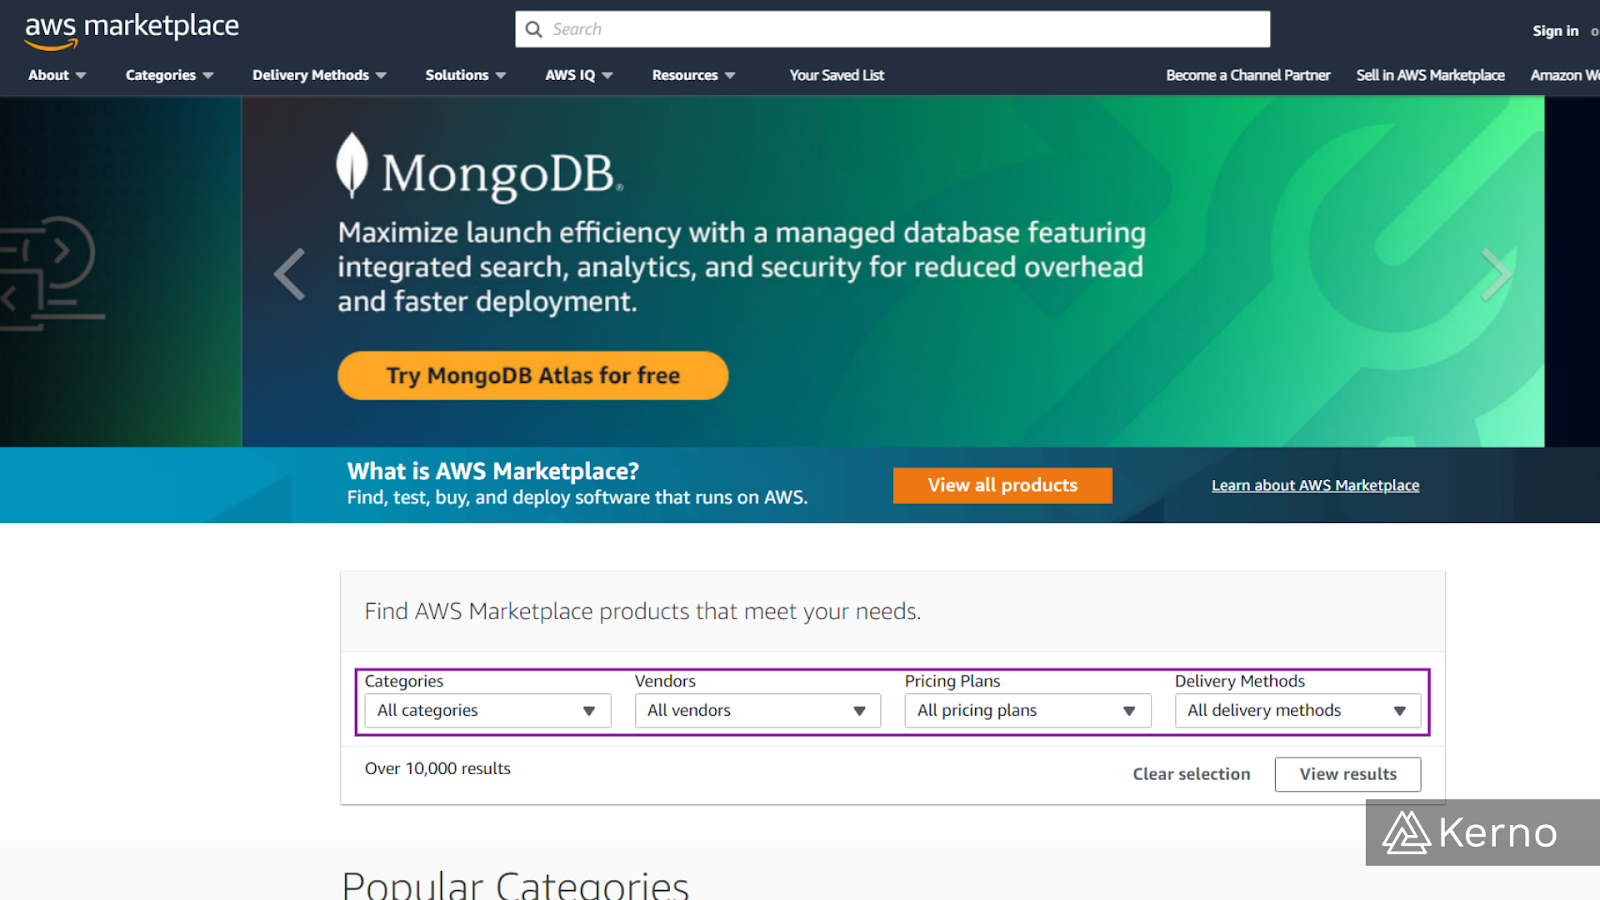
The Figure 3.1 above is the main page of the AWS Marketplace. From this page, the user can search a variety of vendors that supply AMIs. Here’s an explanation of search parameters:
- Categories | The user is able to search by “Infrastructure Software, “DevOps”, “Business Applications”, “Machine Learning”, “Data Products”, “IoT”, “Professional Services”, “Industries”, and all the sub categories for those options.
- Vendors | The user is able to search software that has been delivered by a specific vendor.
- Pricing Plans | It’s important to note that one of the reasons to dliver AMIs via the Marketplace for a vendor is to charge for using said AMI. You can filter for various billing models such as Hourly, Monthly, Free, By Hosts, etc.
- Delivery Methods | In addition to AMIs, some of the tools / software is delivered via other means - Ex: deployed through Kubernetes using AWS EKS. By using the filter, the user can ensure that the software they’re getting can be deployed using the method of their choice.
Option 2 - User Created AMIs
An AWS user can create an AMI from their own instance. This is particularly useful for two reasons - 1. You can customize your instance and load the software of your choice. 2. You’ll keep the instance private to your account. These AMIs won’t be available to any other users unlike the public AMI marketplace.
Creating an AMI from an EC2 Instance
In this section, we’re going to walk you through an example of the AMI creation process.
Note: you’ll need to have an EC2 Instance running on your AWS Account to create an AMI.
Step 1 - Create an Image of an EC2 Instance
1.1 - From the EC2 Dashboard, click on “Instances.”
1.2 - From the list of EC2 instances, right-click on the EC2 instance you’d like to create an AMI for.
1.3 - From the drop-down menu, select “Image and templates.”
1.4 - From the drop-down menu, click on “Create image.”
Step 2 - Specify the Parameters of the AMI (Part 1 / 2)
2.1 - [Optional] From the Create image menu, enter an “Image name.”
2.2 - [Optional] From the Create image menu, enter an “Image description.”
2.3 - [Optional] Modify the size of the EBS Volume attached to the instance, enter size in GB.
2.4 - [Optional] Modify the “Delete on Termination” setting of the EBS Volume attached to the instance, use the checkmark to enable.
2.5 - [Optional] Add another volume to the instance if needed, click on “Add volume” and specify parameters.

Step 3 - Specify the Parameters and Create Image (Part 2 / 2)
3.1 - [Optional] From the Tags menu, you can specify to tag the image and snapshot together.
3.2 - [Optional] From the Tags menu, specify a tag for the AMI.
3.3 - At the bottom of the page, click on “Create image.”
Frequently Asked Questions
What are the benefits of using an Amazon machine image?
An Amazon Machine Image (AMI) is a pre-configured template used to create EC2 instances, and it provides several benefits:
- Consistency: AMIs ensure consistency in your infrastructure by allowing you to create instances with predefined configurations, including the operating system, software packages, libraries, and custom configurations. This consistency reduces the risk of configuration drift and makes it easier to deploy and manage multiple instances.
- Reusability: Once you've created an AMI with the desired configuration, you can reuse it to launch multiple instances with identical setups. This saves time and effort compared to manually configuring each instance.
- Rapid Scaling: AMIs facilitate rapid scaling of your infrastructure. You can quickly launch new instances based on an existing AMI to handle increased demand or replace instances that have become unresponsive or unhealthy.
- Versioning and Rollback: AWS allows you to create multiple versions of an AMI, enabling you to track changes and roll back to previous versions if necessary. This feature is useful for managing updates, patches, and changes to your instance configurations.
- Security: By creating custom AMIs with hardened configurations and security measures implemented, you can ensure that new instances launched from those AMIs inherit those security settings. This helps maintain a secure and compliant infrastructure.
- Cost Optimization: AMIs can include pre-installed software licenses, which can help optimize costs by avoiding additional licensing fees. Additionally, pre-configured AMIs can reduce the time required for instance setup and configuration, potentially reducing operational costs.
- Customization: AMIs provide flexibility for customizing instances to meet specific requirements. You can create AMIs tailored to your organization's needs, including specific software stacks, configurations, and security settings.
- Disaster Recovery: AMIs can be used as part of a disaster recovery strategy. By regularly creating and storing updated AMIs, you can quickly launch new instances in the event of a failure or disaster, minimizing downtime and data loss.
Overall, Amazon Machine Images offer a powerful way to standardize, automate, and scale your EC2 instances while providing flexibility and control over your infrastructure.
What is the difference between AMI and EC2?
Amazon Machine Image (AMI) is a template within the AWS ecosystem that encapsulates the software configuration necessary to launch an Amazon Elastic Compute Cloud (EC2) instance. Essentially, an AMI serves as a blueprint for creating virtual servers in the AWS cloud. It includes the operating system, applications, libraries, and configuration settings required for the instance. AMIs can be either AWS-provided or custom-built, allowing users to tailor their instances to specific needs. On the other hand, EC2 is the AWS service that allows users to rent virtual servers (instances) based on selected AMIs. Users can configure various aspects of EC2 instances, such as instance types, network settings, and security groups, to meet their requirements. In essence, EC2 leverages AMIs to provide scalable and flexible computing resources within the AWS cloud infrastructure.
Is AMI same as Docker?
Amazon Machine Image (AMI) and Docker are distinct technologies used for deploying applications, operating at different levels of abstraction and serving different purposes. AMI serves as a template for creating virtual servers within the Amazon Elastic Compute Cloud (EC2) service, containing the operating system, software packages, and configuration settings necessary for launching an EC2 instance. On the other hand, Docker is a containerization platform enabling applications and their dependencies to be packaged into lightweight, portable containers. Docker containers, based on Docker images, offer a consistent environment for running applications across various computing environments. While AMIs are focused on provisioning entire virtual servers with specific software configurations, Docker images provide a means to package and deploy containerized applications independently of the underlying infrastructure. Thus, while both technologies facilitate application deployment, they do so at different layers of the technology stack with distinct functionalities.
Is AMI free in AWS?
Amazon Machine Images (AMIs) themselves are not inherently free in AWS. However, AWS provides many pre-configured and publicly available AMIs at no cost. These include AMIs for popular operating systems like Amazon Linux, Ubuntu, and Microsoft Windows Server, as well as various application stacks and development frameworks.
While these base AMIs may be free, keep in mind that you may incur charges for the resources associated with running instances launched from those AMIs. These charges typically include EC2 instance usage, data transfer, and any additional services or resources provisioned within the instance.
Additionally, if you create custom AMIs or use third-party AMIs from the AWS Marketplace, there may be associated charges. For example, you may incur charges for storing custom AMIs in Amazon S3 or for licensing fees associated with third-party software included in the AMIs.
It's important to review the pricing details for EC2 instances and associated services to understand the cost implications of using AMIs in your AWS environment. In many cases, using publicly available AMIs or those provided by AWS can help minimize costs, especially for basic compute needs.
Conclusion - Image Listing in AWS EC2
Once the process is complete, you’ll have a listing of the AMI under the AMIs section in the EC2 Dashboard as shown below.
