
Introduction to Application Load Balancers (ALB)
Application load balancers operate at the 7th layer of the OSI Model. They’re used to direct the incoming traffic to the correct application and thus operate on HTTP, HTTPS, and WebSocket protocols.
In this tutorial, we will deploy an application load balancer (ALB) in our AWS infrastructure and demonstrate how it distributes traffic across different applications.
Prerequisites
To follow along with this tutorial, you will need:
- A basic understanding of AWS EC2 instances.
- A basic understanding of AWS EBS Elastic Block Storage.
- A basic understanding of AWS ELB - Elastic Load Balancers.
Provisioning Two EC2 Instances for This Exercise
In order to test the application load balancer, we’re going to launch two EC2 Instances. The process is described in detail in the following tutorial - AWS EC2
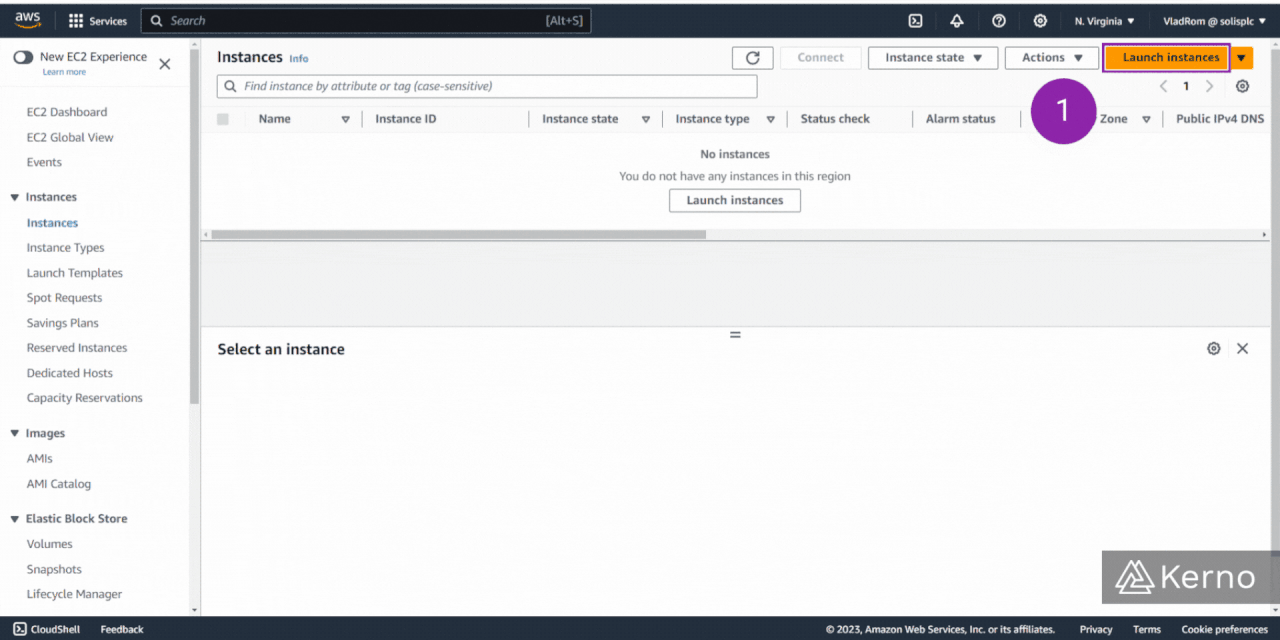
Step 1 - From the Instances Tab in EC2 Dashboard, Launch Instances
1.1 - From the Instances, click on “Launch Instances.”
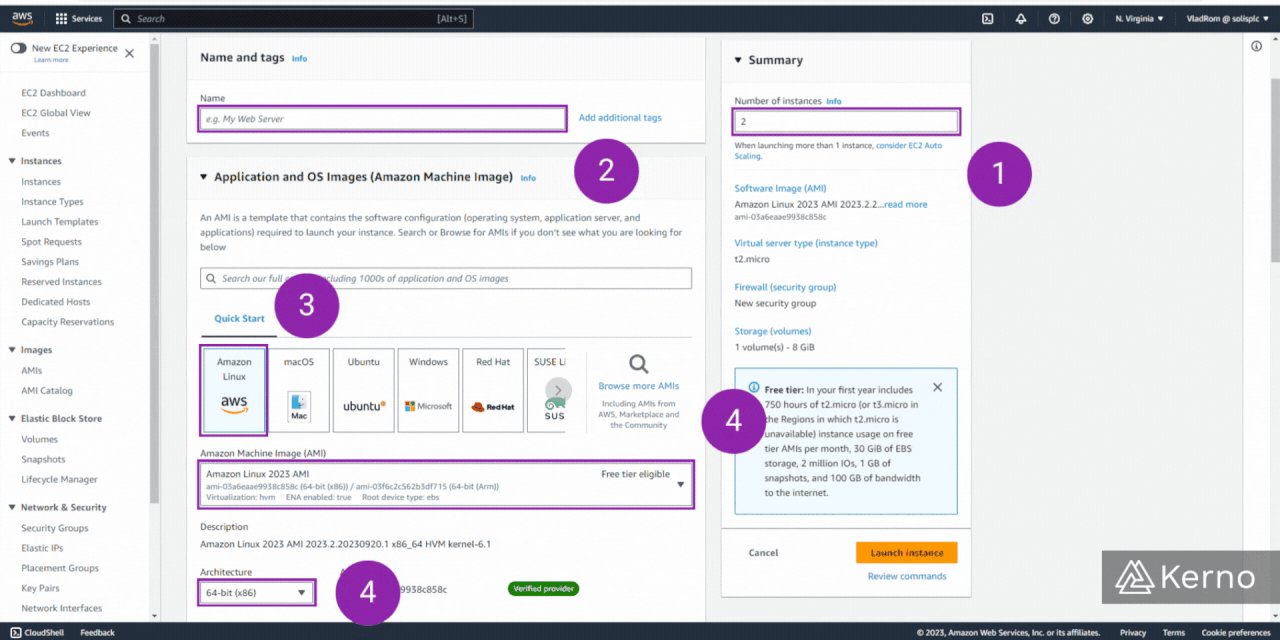
Step 2 - Specify Instance Parameters [Part 1 / 4]
2.1 - From the Summary Tab, specify “Number of instances = 2.”
2.2 - From the Name and Tags menu, specify a name for the first instance.
2.3 - For the Operating System, select “Amazon Linux.”
2.4 - For the AMI, select “Amazon Linux 2023 AMI.”
2.5 - For the Architecture, select “Amazon Linux.”
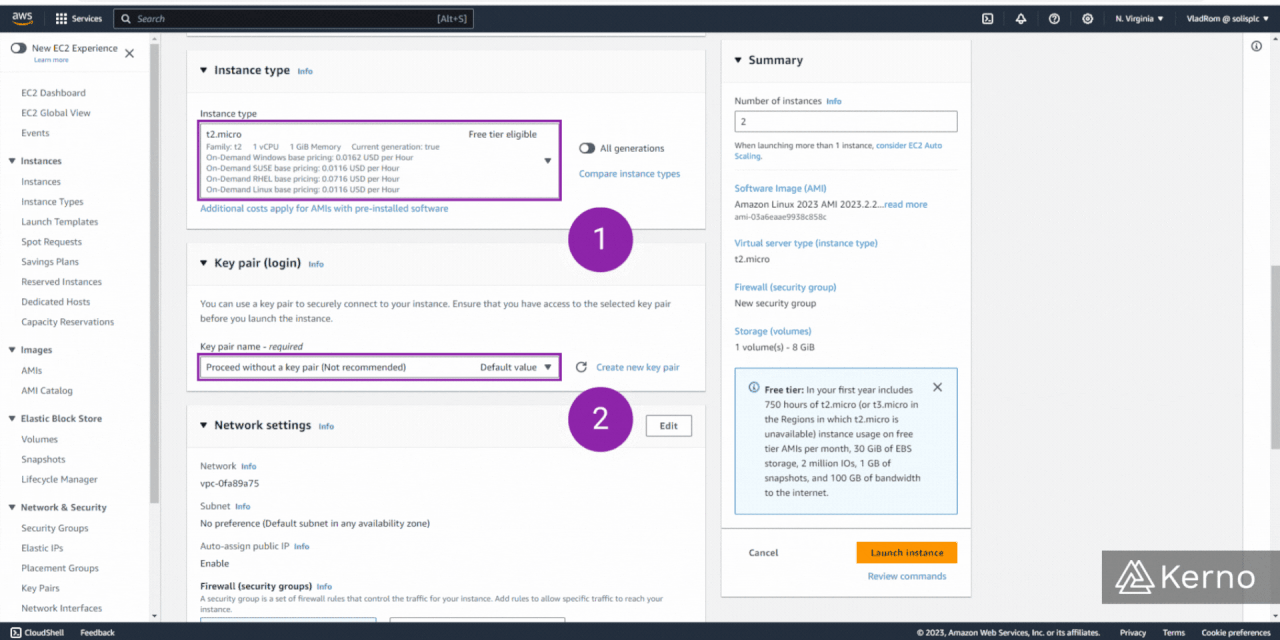
Step 3 - Specify Instance Parameters [Part 2 / 4]
3.1 - From the Instance Type, specify “t2.micro”
3.2 - From the Key Pair, specify “Proceed without a key pair,” or select a key-value pair you’d like to use for this exercise.
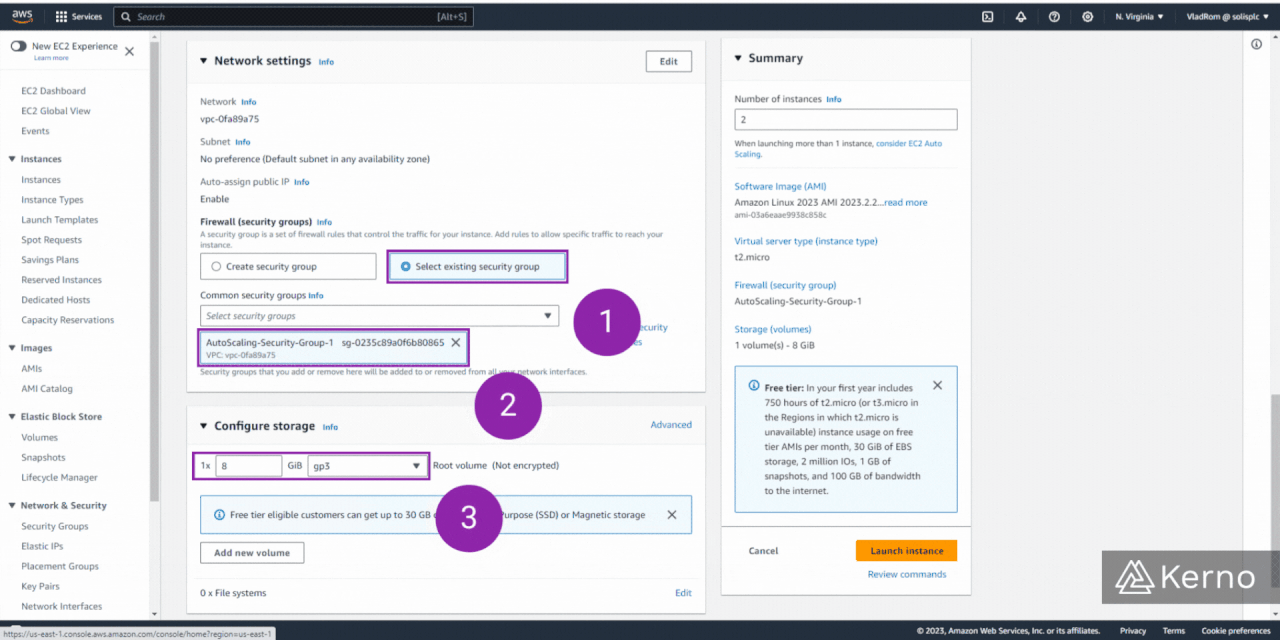
Step 4 - Specify Instance Parameters [Part 3 / 4]
4.1 - From the Network Settings Security Groups, specify “Select existing security group” or create a new one.
4.2 - From the Network Settings Security Groups, specify “Select existing security group” or create a new one.
4.3 - From the Configure Storage section, specify “gp3 - 8 GiB.”
Step 5 - Specify Instance Parameters [Part 4 / 4]
5.1 - From the Advanced Settings, under User Data, specify the code snippet posted below.
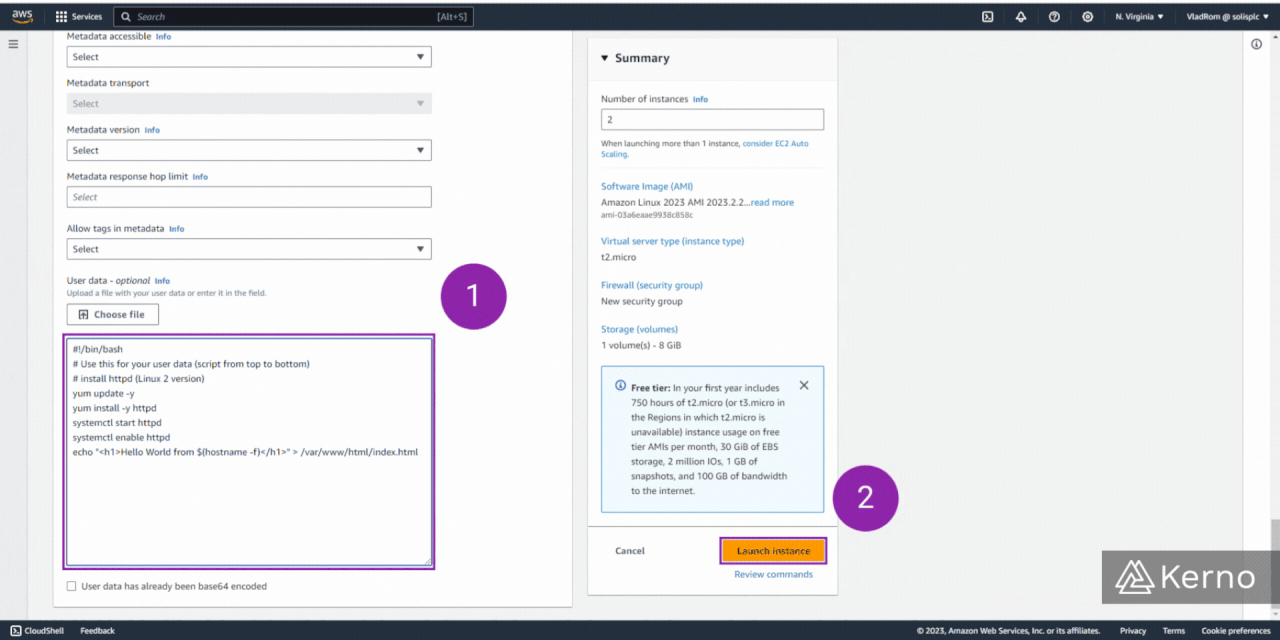
5.2 - From the Summary sidebar, click on “Launch instance.”
At this point, you should have two EC2 Instances within your AWS environment. By navigating to the IP address of each instance, you should receive a message specified within the code snipped above. Note that if you have trouble accessing the instances, verify that your security group inbound rules have been configured correctly.
Creating an Application Load Balancer [ALB] in AWS
At this point, we can create a load balancer that will direct the HTTP traffic to either one of the EC2 Instances we’ve created.
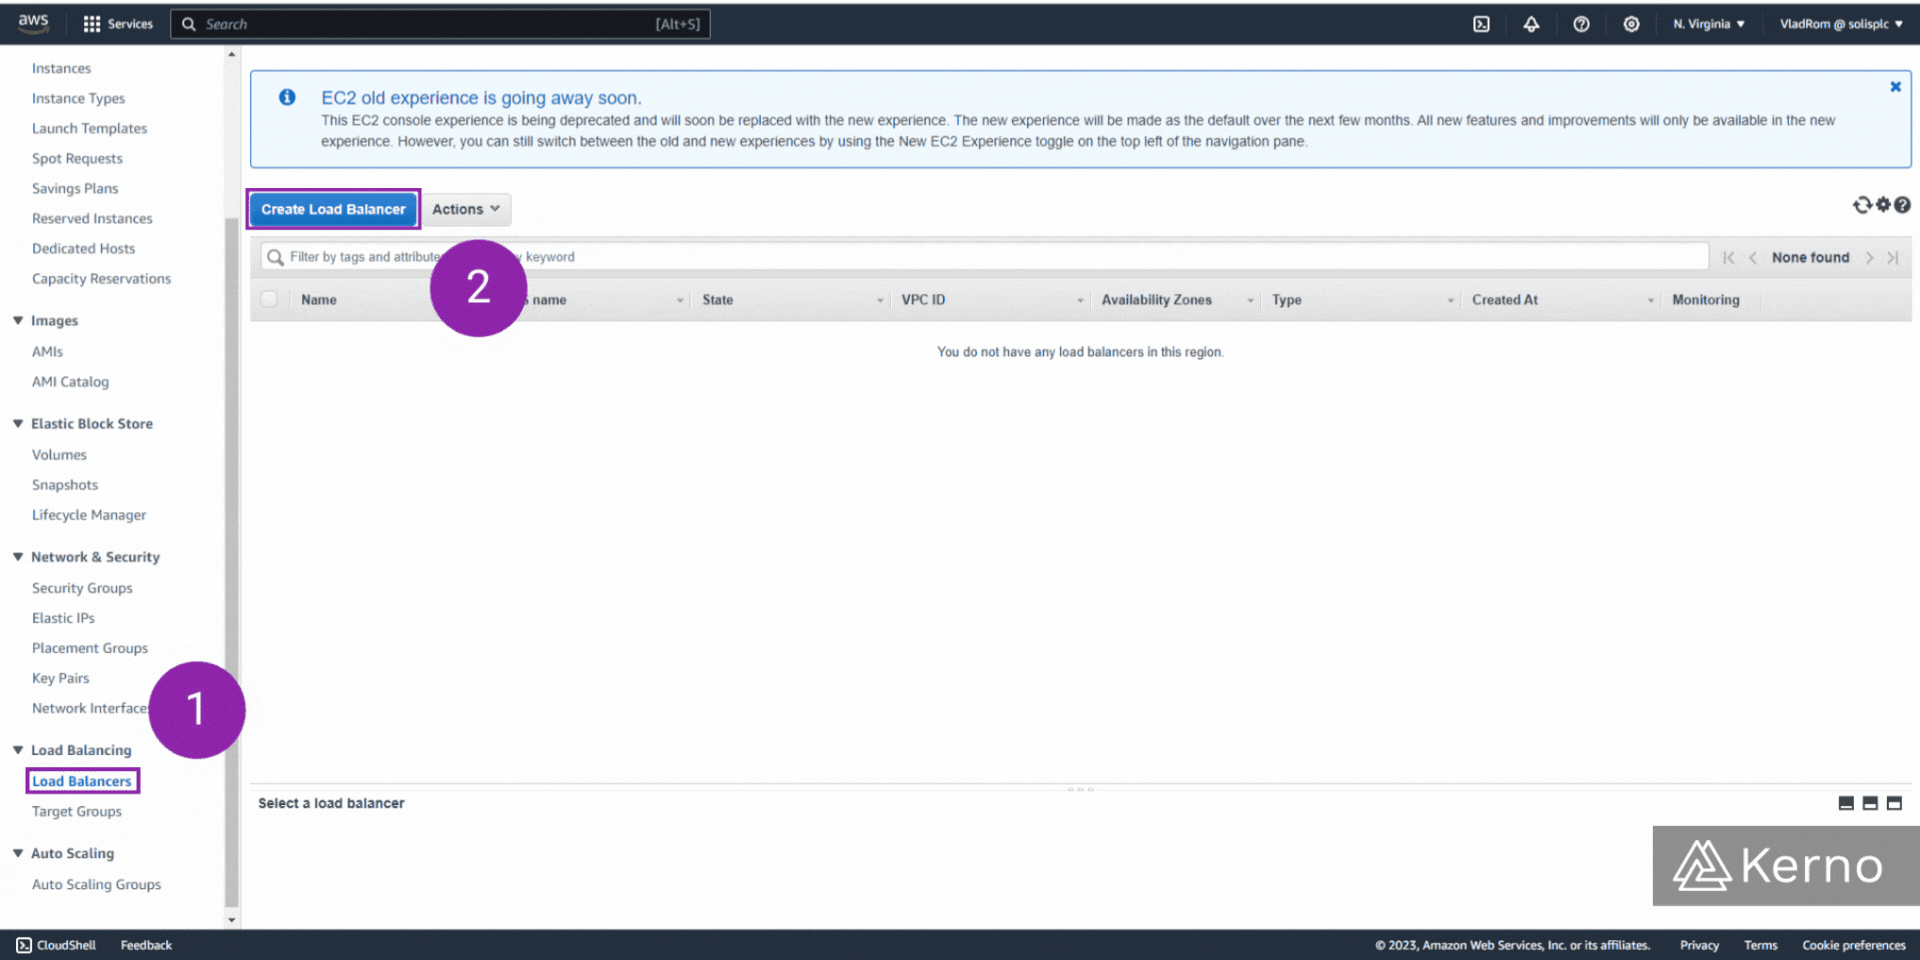
Step 1 - Navigate to the Load Balancers Tab under the EC2 Dashboard & Create a Load Balancer
1.1 - From the left menu, click on “Load Balancer.”
1.2 - From the center menu, click on “Create Load Balancer.”
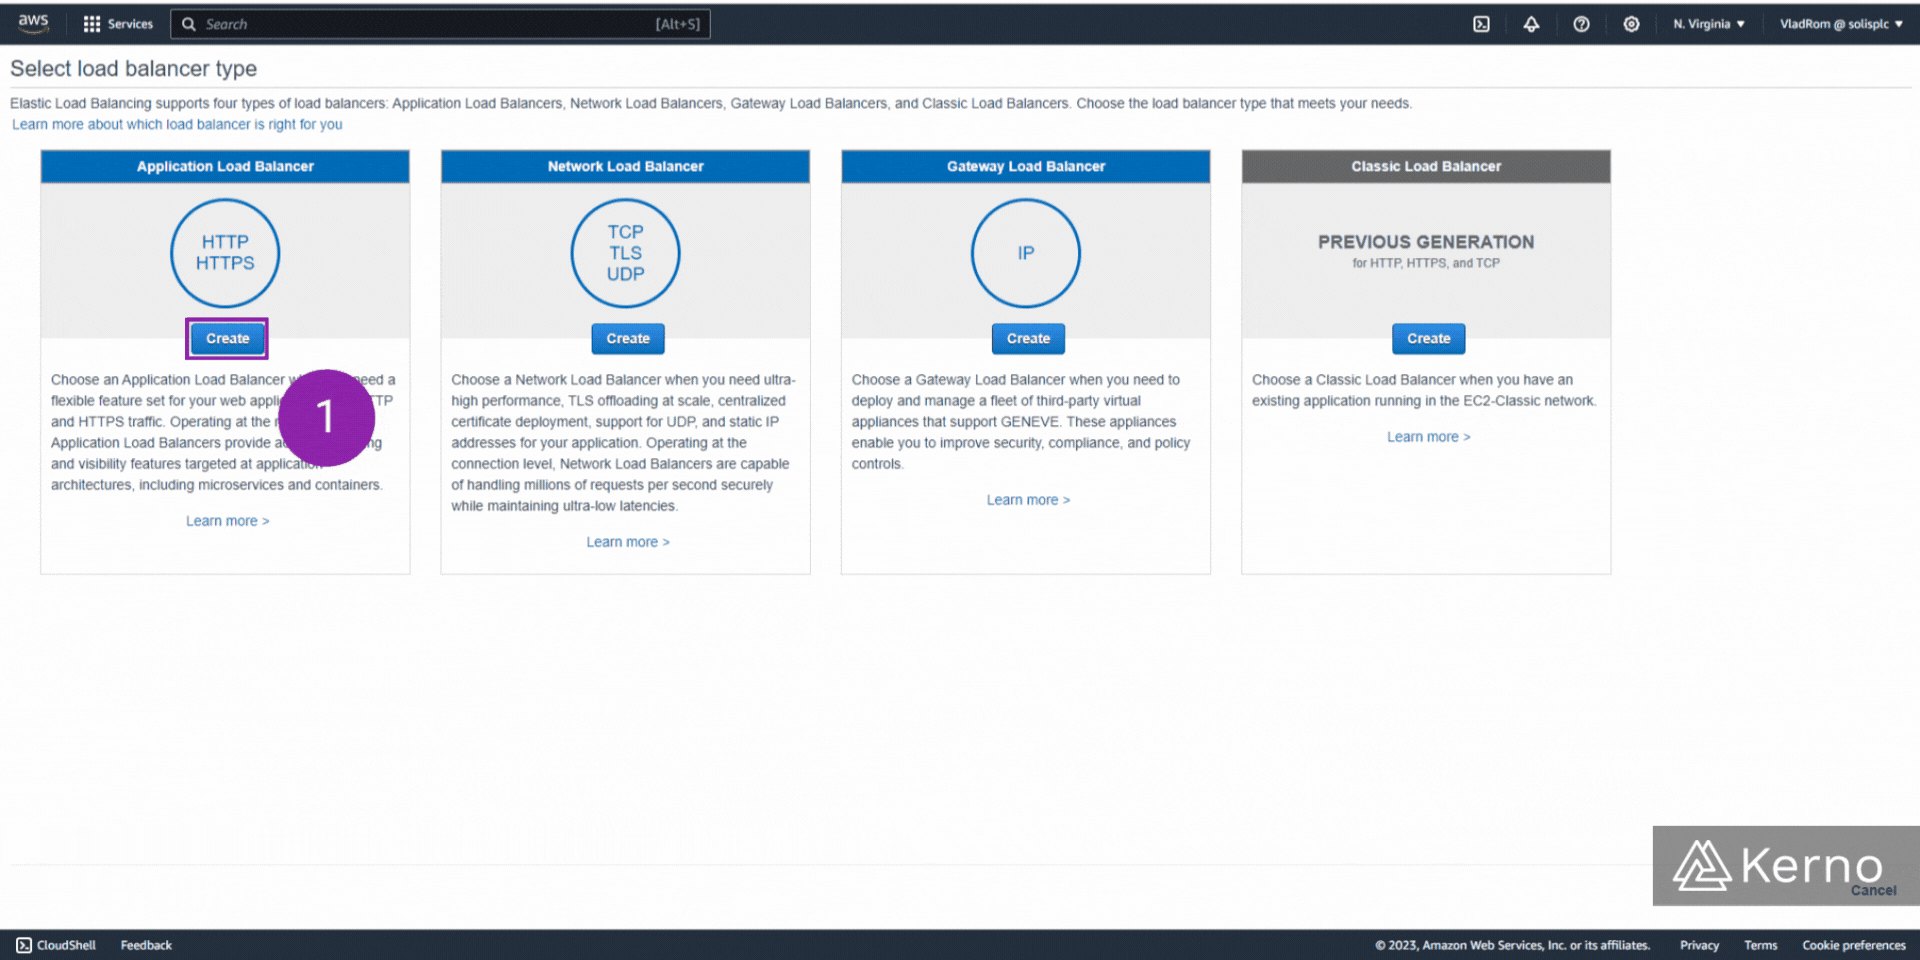
Step 2 - Create an Application Load Balancer
As we’ve covered in the main ELB - Elastic Load Balancer Guide, there are many types of Load Balancers. However, our goal is to focus on the Application Load Balancer which is ideal for the HTTP traffic we’re working with on the EC2 Instances.
2.1 - From the panels, click on “Create” for the Application Load Balancer.
Step 3 - Specify the Parameters for the ALB [Part 1 / 2]
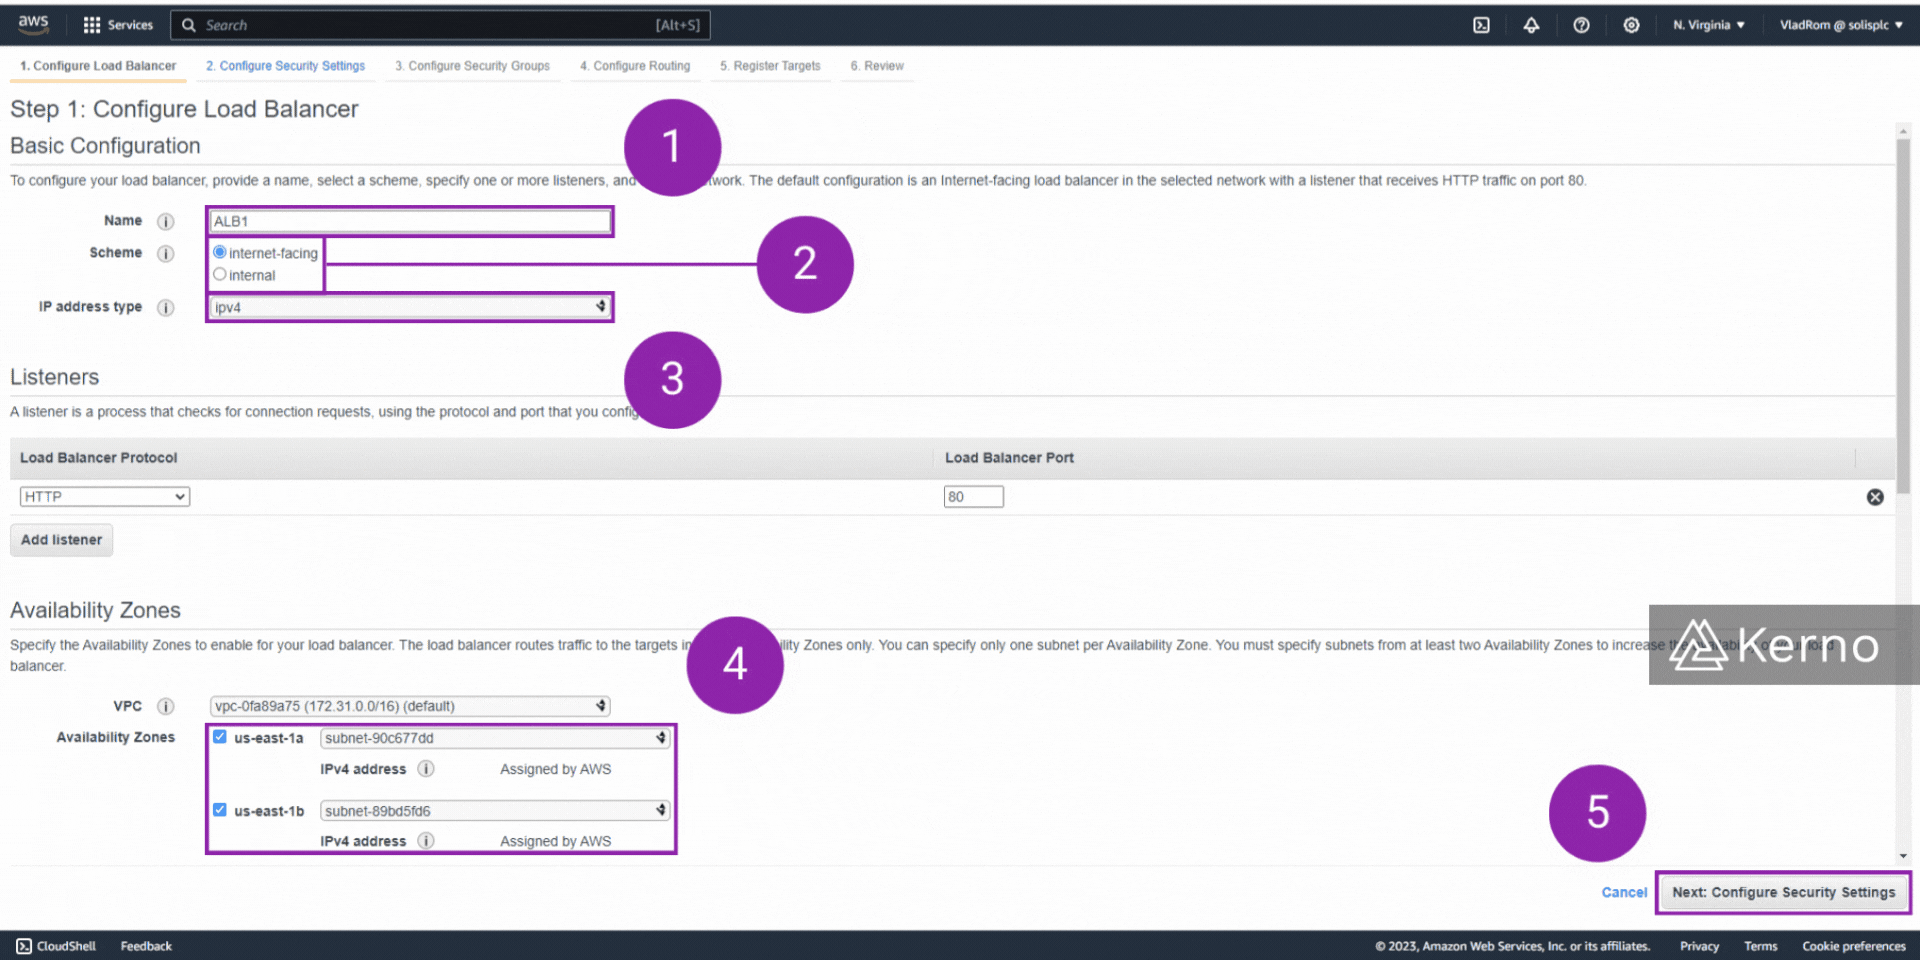
In the first step of configuring an ALB, we’ll be met with the Name, Scheme, IP address type, and availability zones. The name is optional. The scheme will dictate if the traffic to the ALB will come from the outside or within the cloud services environment. It’s important to note that ALBs can route traffic between applications that live in AWS. For the purposes of this tutorial, and since we’d like to see our EC2 instances serve up different pages, we’ll have to set this setting to “internet facing.” The last option, which is Availability Zones is critical as the traffic can be managed across them. In this example, we’re going to enable all of them.
3.1 - Enter a name for the load balancer.
3.2 - From the Scheme, select “Internet facing.”
3.3 - From the IP address, select “IPv4.”
3.4 - From the Availability Zone section, select each one.
3.5 - At the bottom of the page, click on “Next: Configure Security Settings.”
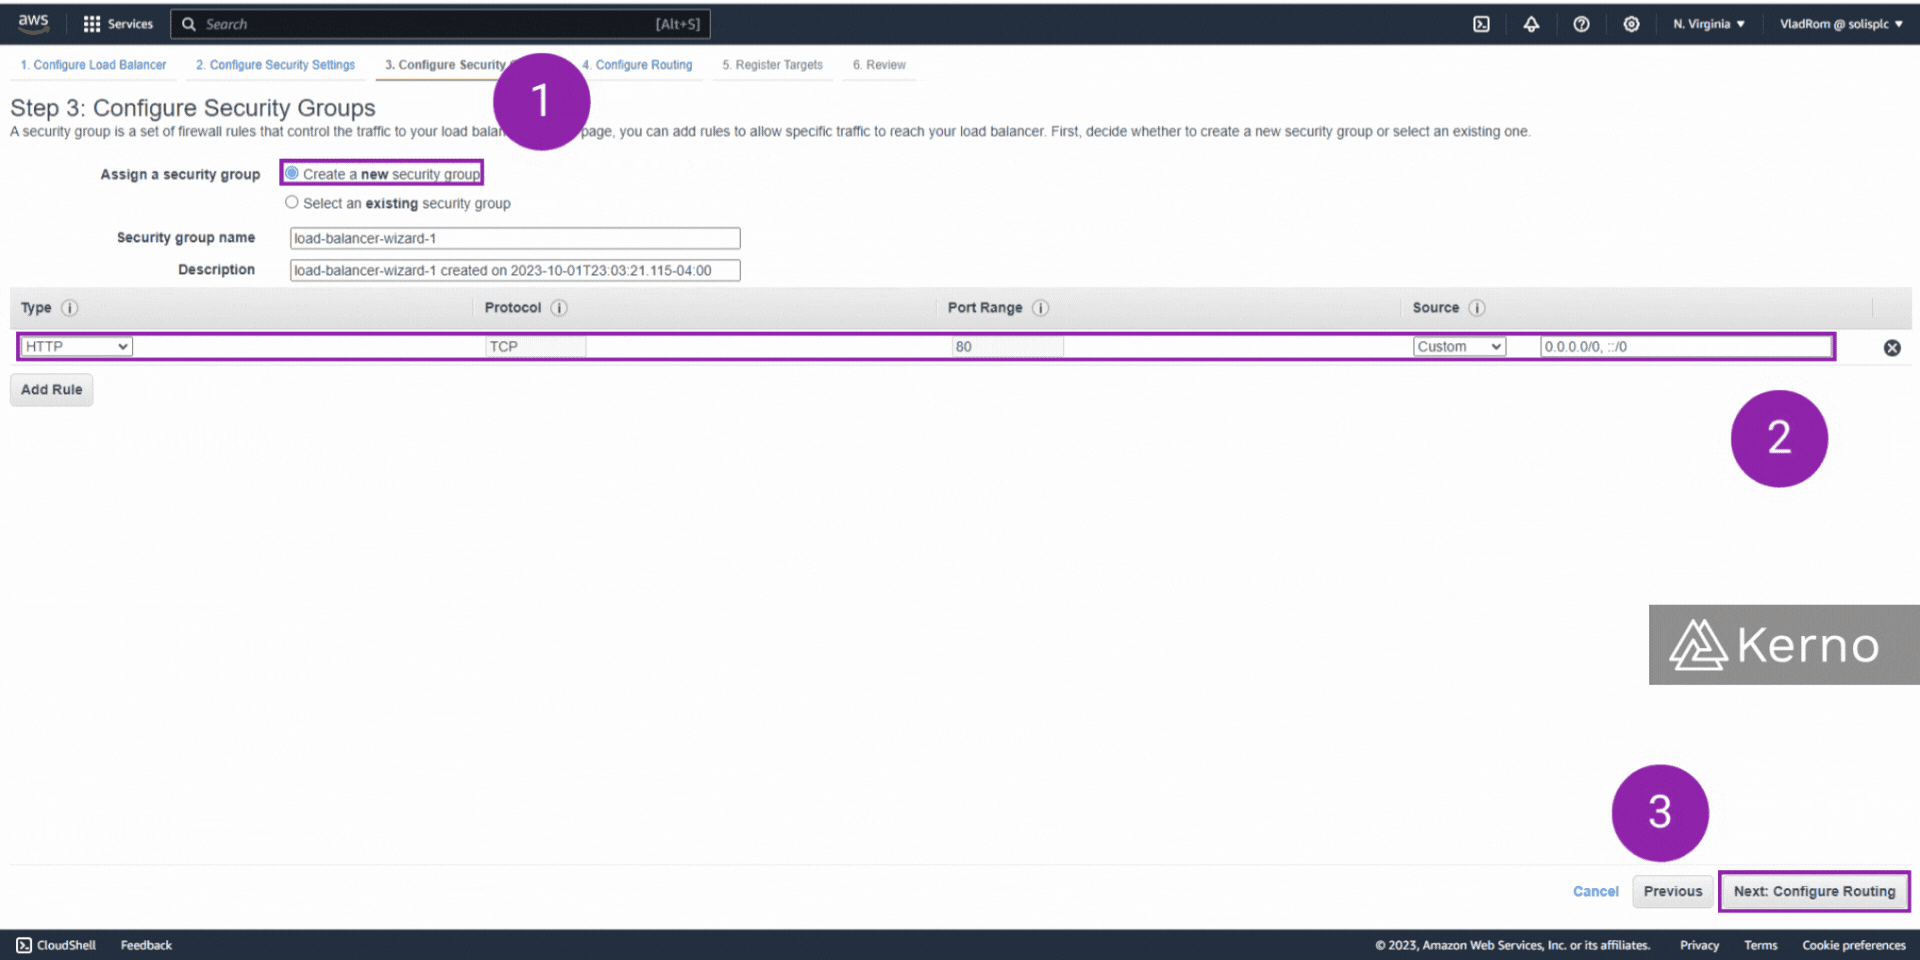
Step 4 - Specify the Parameters for the ALB [Part 2 / 2]
Security Groups will dictate which traffic is allowed and restricted in / out of various services. They’re a necessity for many infrastructure components within AWS. In this case, we’re going to create a new Security Group that allows any traffic from the outside. It’s important to note that we’re doing this for learning purposes only. We recommend that you configure the Security Group settings suitable for your organization.
4.1 - At the Assign a security group setting, click on “Create a new security group.”
4.2 - For the rule setting, choose HTTP as Type, TCP as Protocol, 80 as Port Range, 0.0.0.0 ../0 as Source.
4.3 - At the bottom of the page, click on “Next: Configure Routing.”
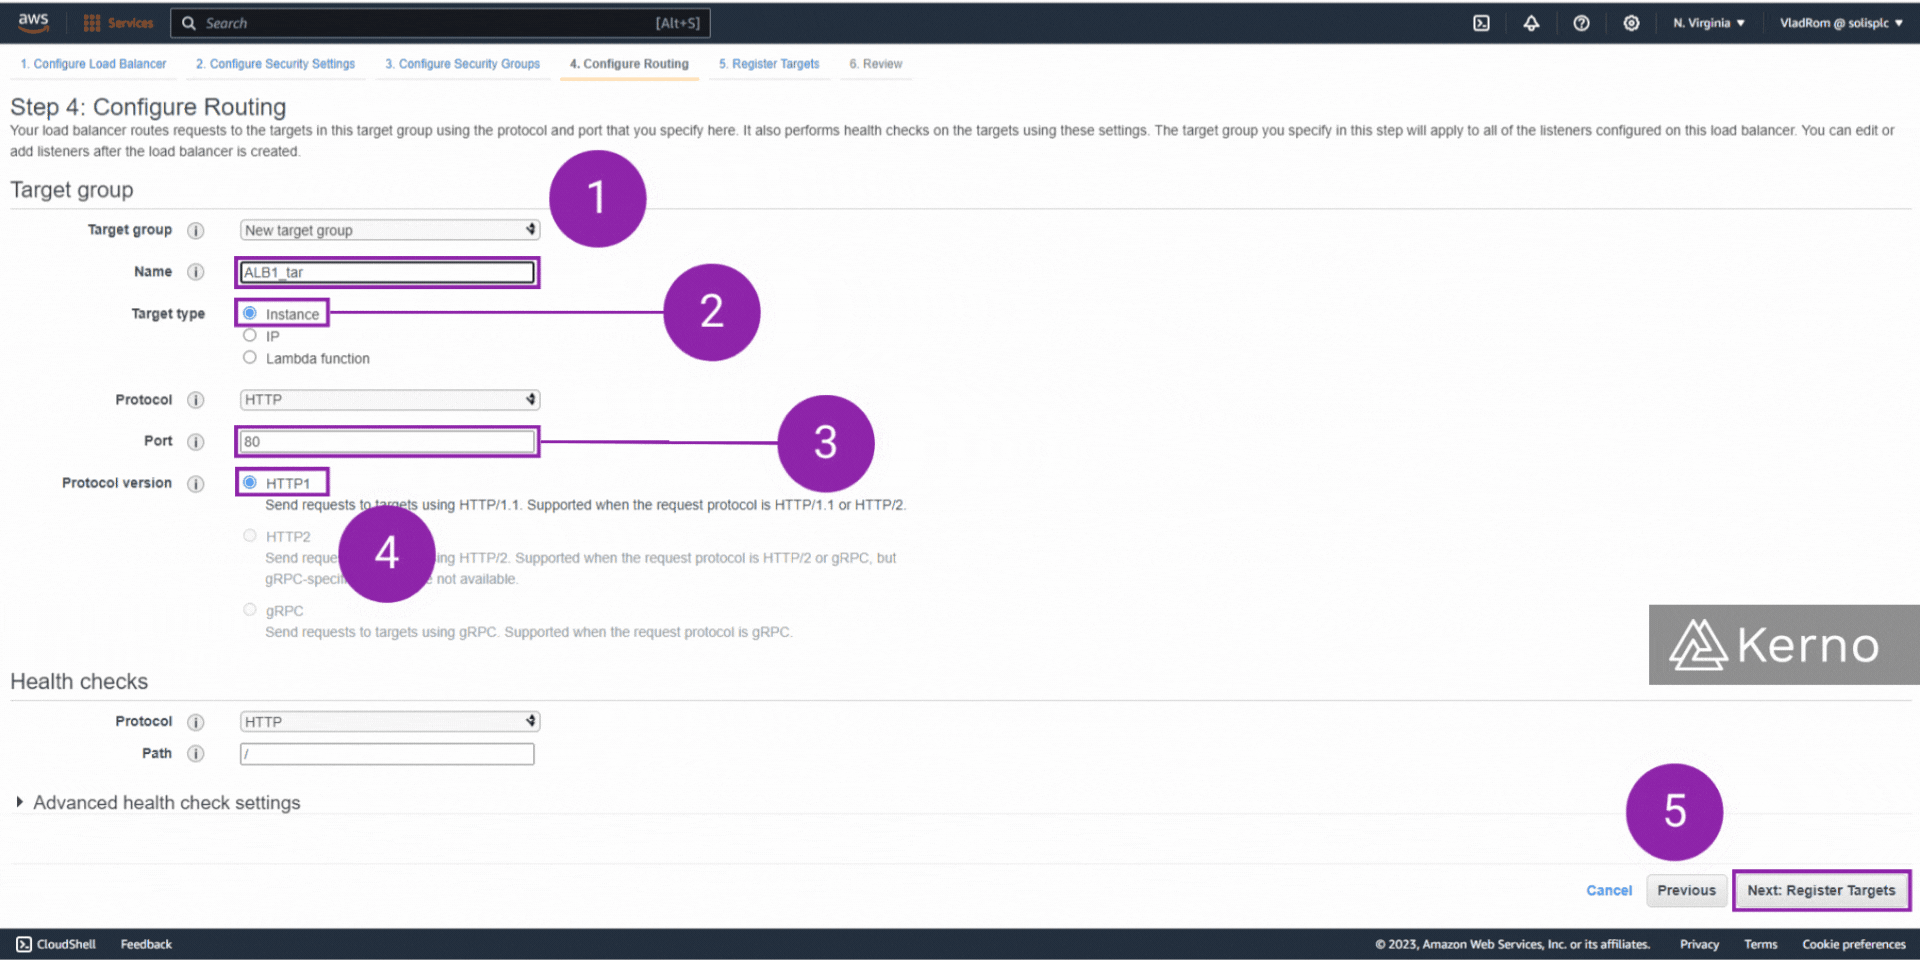
Step 5 - Specify the Target Group
The target group is what contains the instances, or other assets / infrastructure that will be serviced traffic from the ALB. In this section, we’re going to create a new target group that will contain the two EC2 instances we’ve created before. Note that you’ll need to create separate target groups and assign them to the ALB if you wish to incorporate different ressources - Ex: Instances and Lambda Functions.
5.1 - Enter a name for the Target Group.
5.2 - For the Target Type setting, choose “Instance.”
5.3 - For the Port setting, choose “80.” - This needs to match the port of the instances.
5.4 - For the Protocol Version setting, choose “HTTP.”
5.5 - At the bottom of the page, click on “Next: Register Settings.”
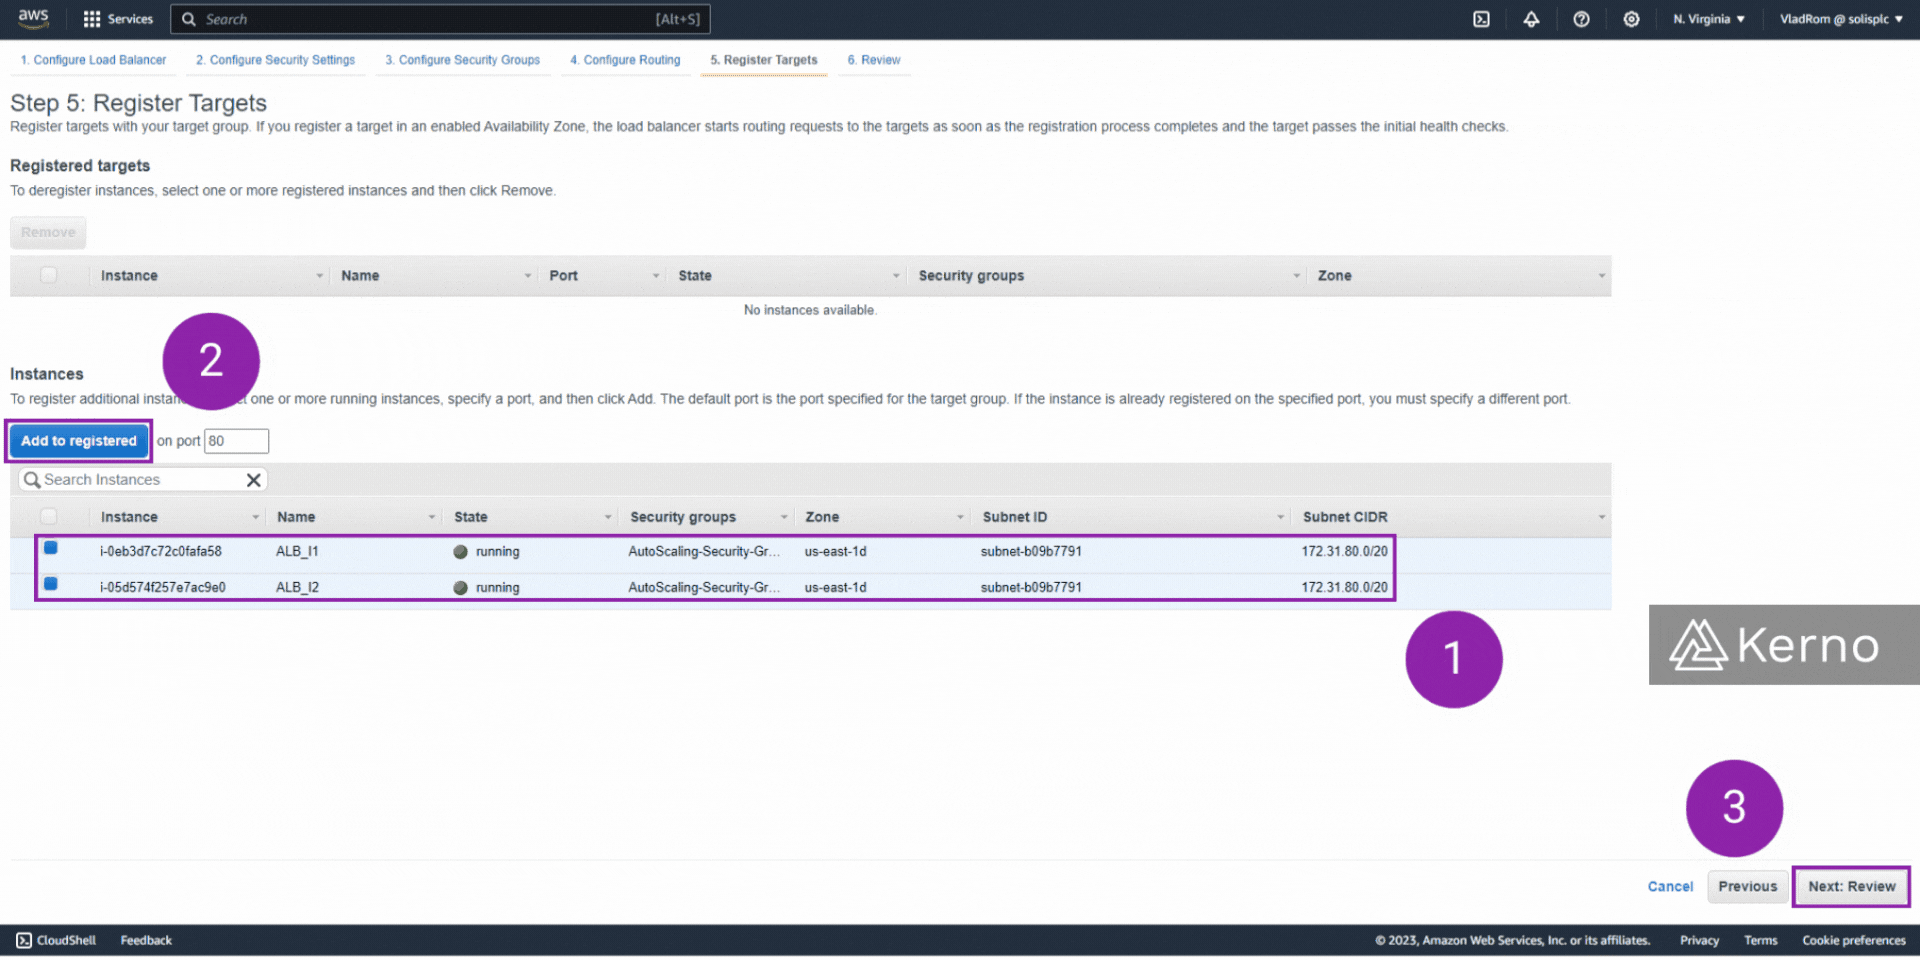
Step 6 - Adding Instances to the Target Group
The target group has been specified, but hasn’t had any members added to it. If you’ve done everything correctly in the earlier steps of this tutorial, you should be able to select the instances we had created and add them to the target groups we’ve just specified.
6.1 - Select both instances.
6.2 - Above the selection are, click on “Add to registered.”
6.3 - At the bottom of the page, click on “Next: Review.”
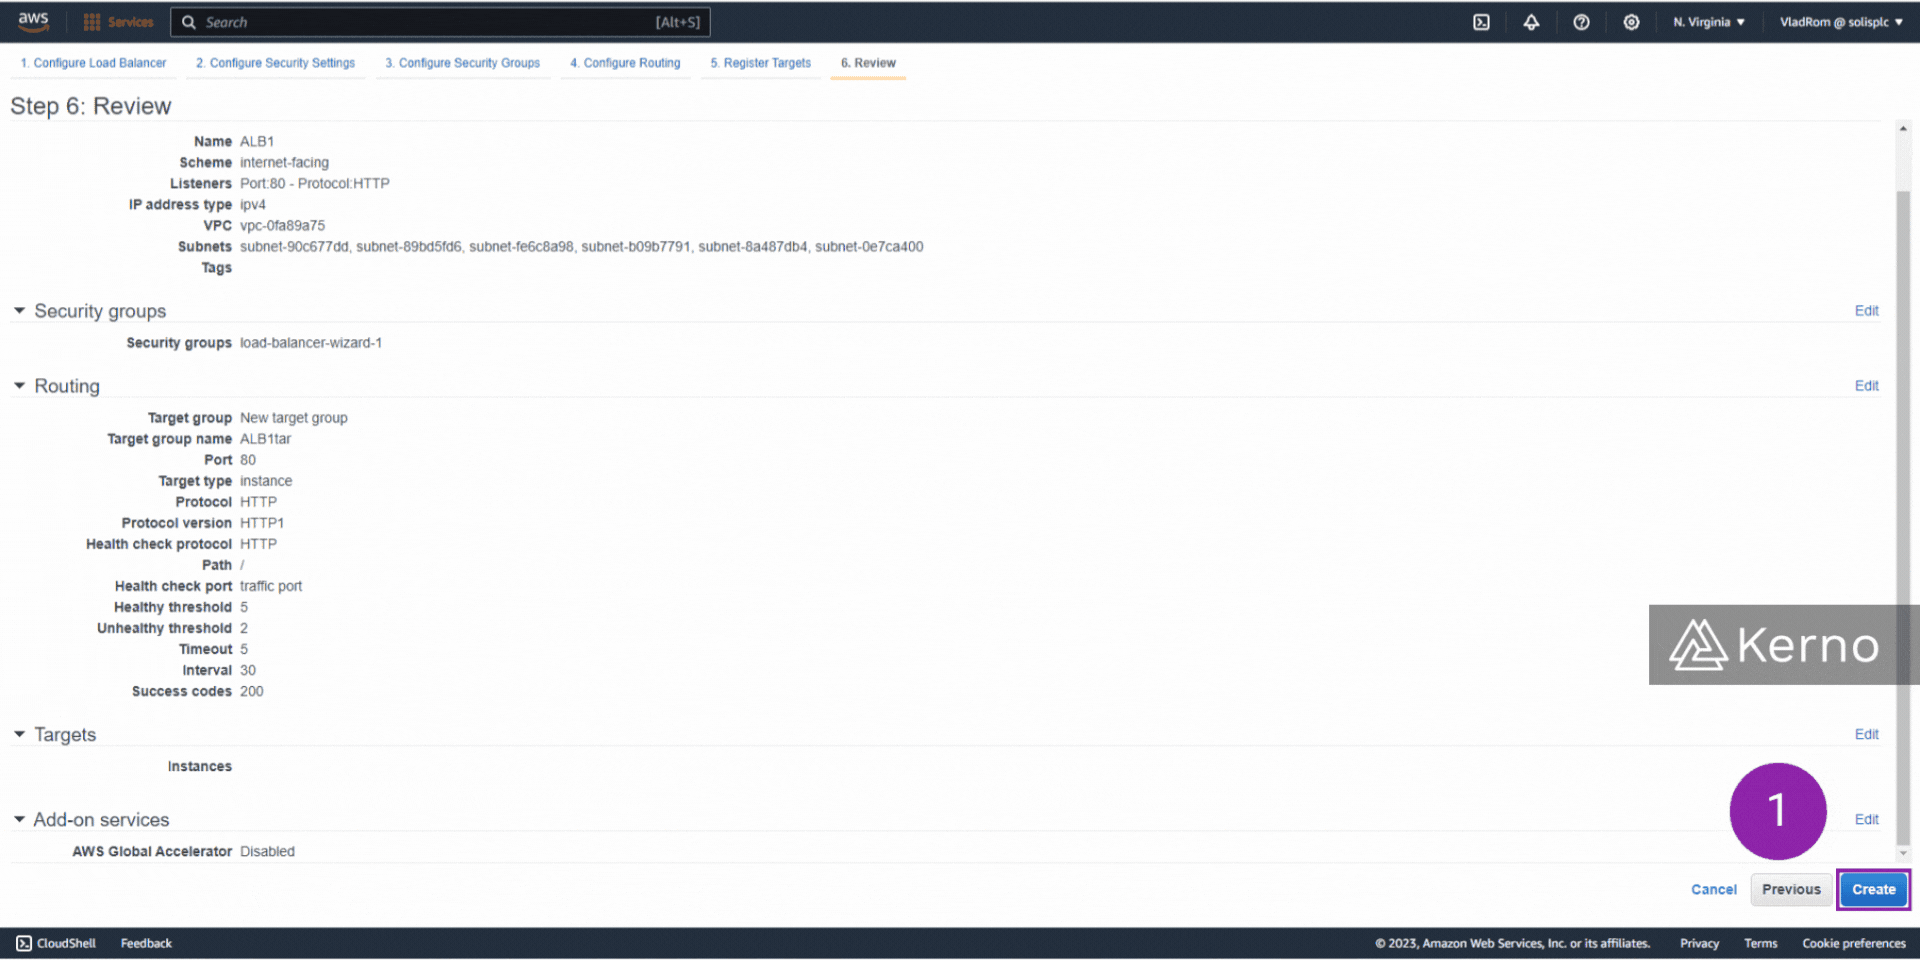
Step 7 - Validate all settings / configs & create
At this point, we’ve finalized the configuration of the ALB. Spend a moment to verify the settings.
7.1 - At the bottom of the page, click on “Create.”
Validating an Application Load Balancer [ALB] in AWS
The ALB we’ve created in the previous steps should now be starting. It can take anywhere between 30 seconds and a few minutes for the ALB to become “Active.” Before then, you’ll probably see unexpected results wily trying to validate the functionality of the service.
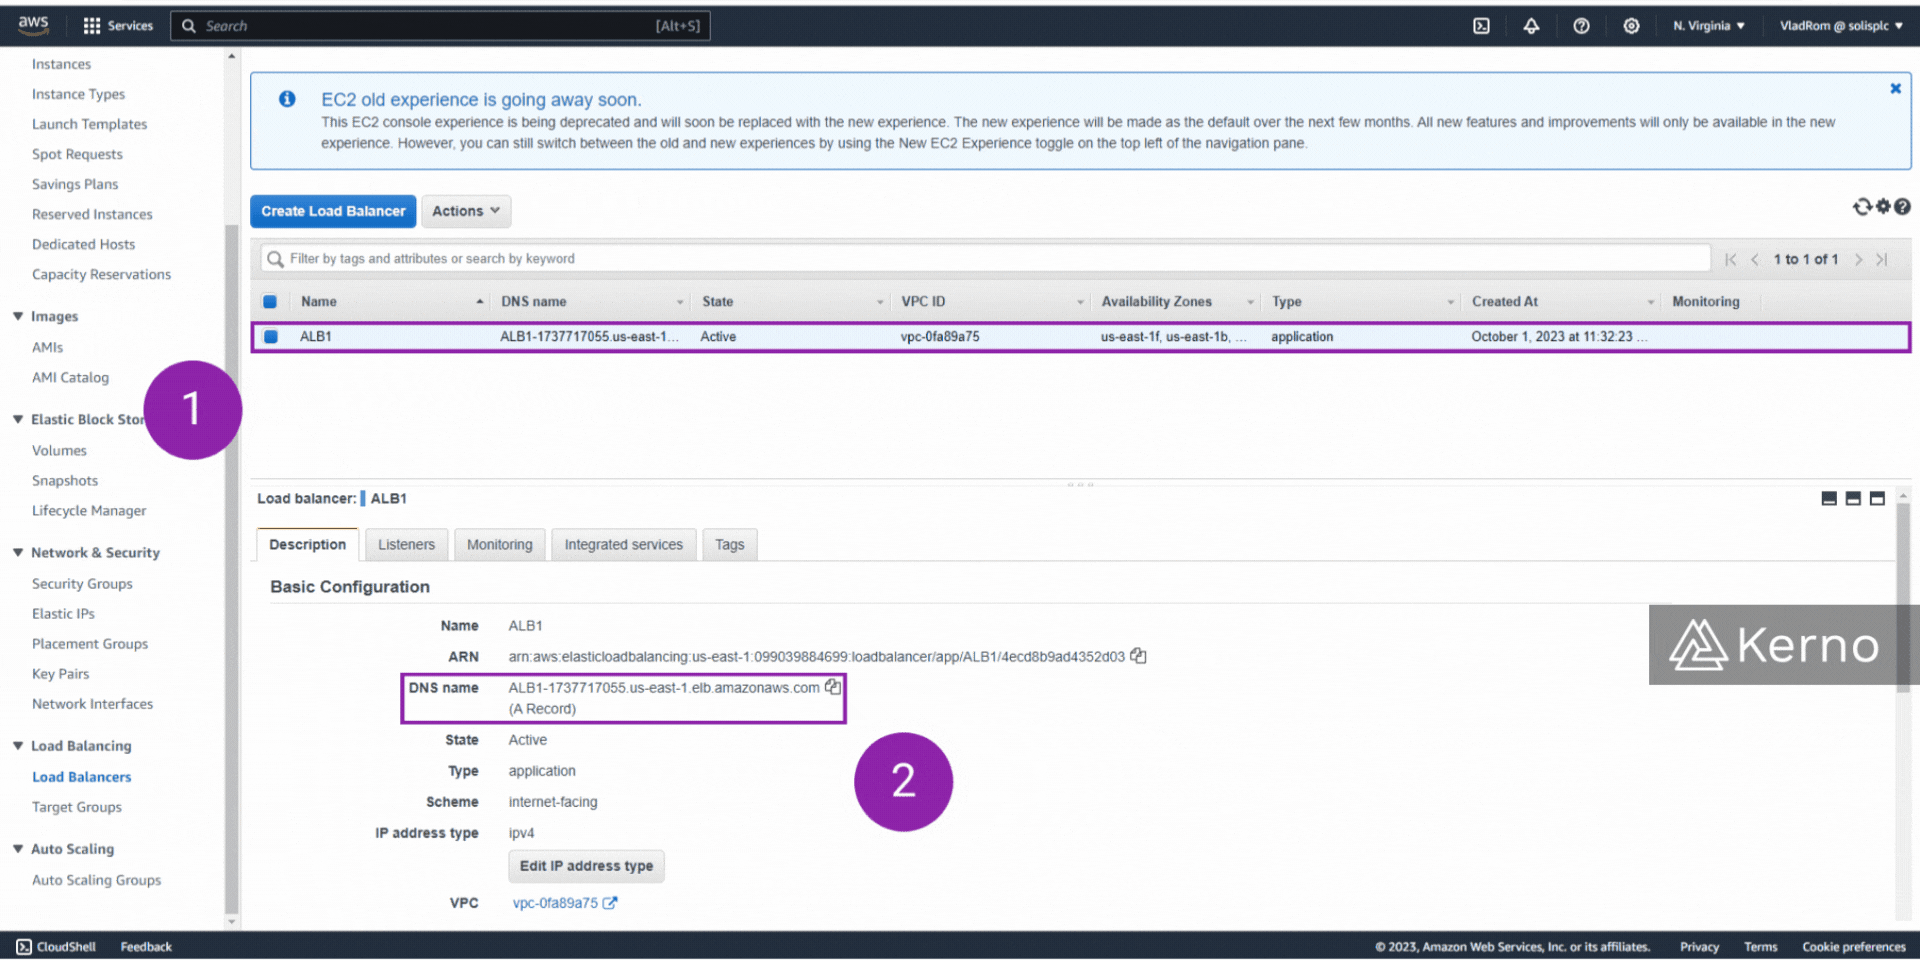
Step 1 - Navigate to the Load Balancers Tab under the EC2 Dashboard & Create a Load Balancer
1.1 - From the Load Balancers tab, select the load balancer we just created.
1.2 - From the Description tab, copy the DNS name.
Step 2 - Validate ALB Targets
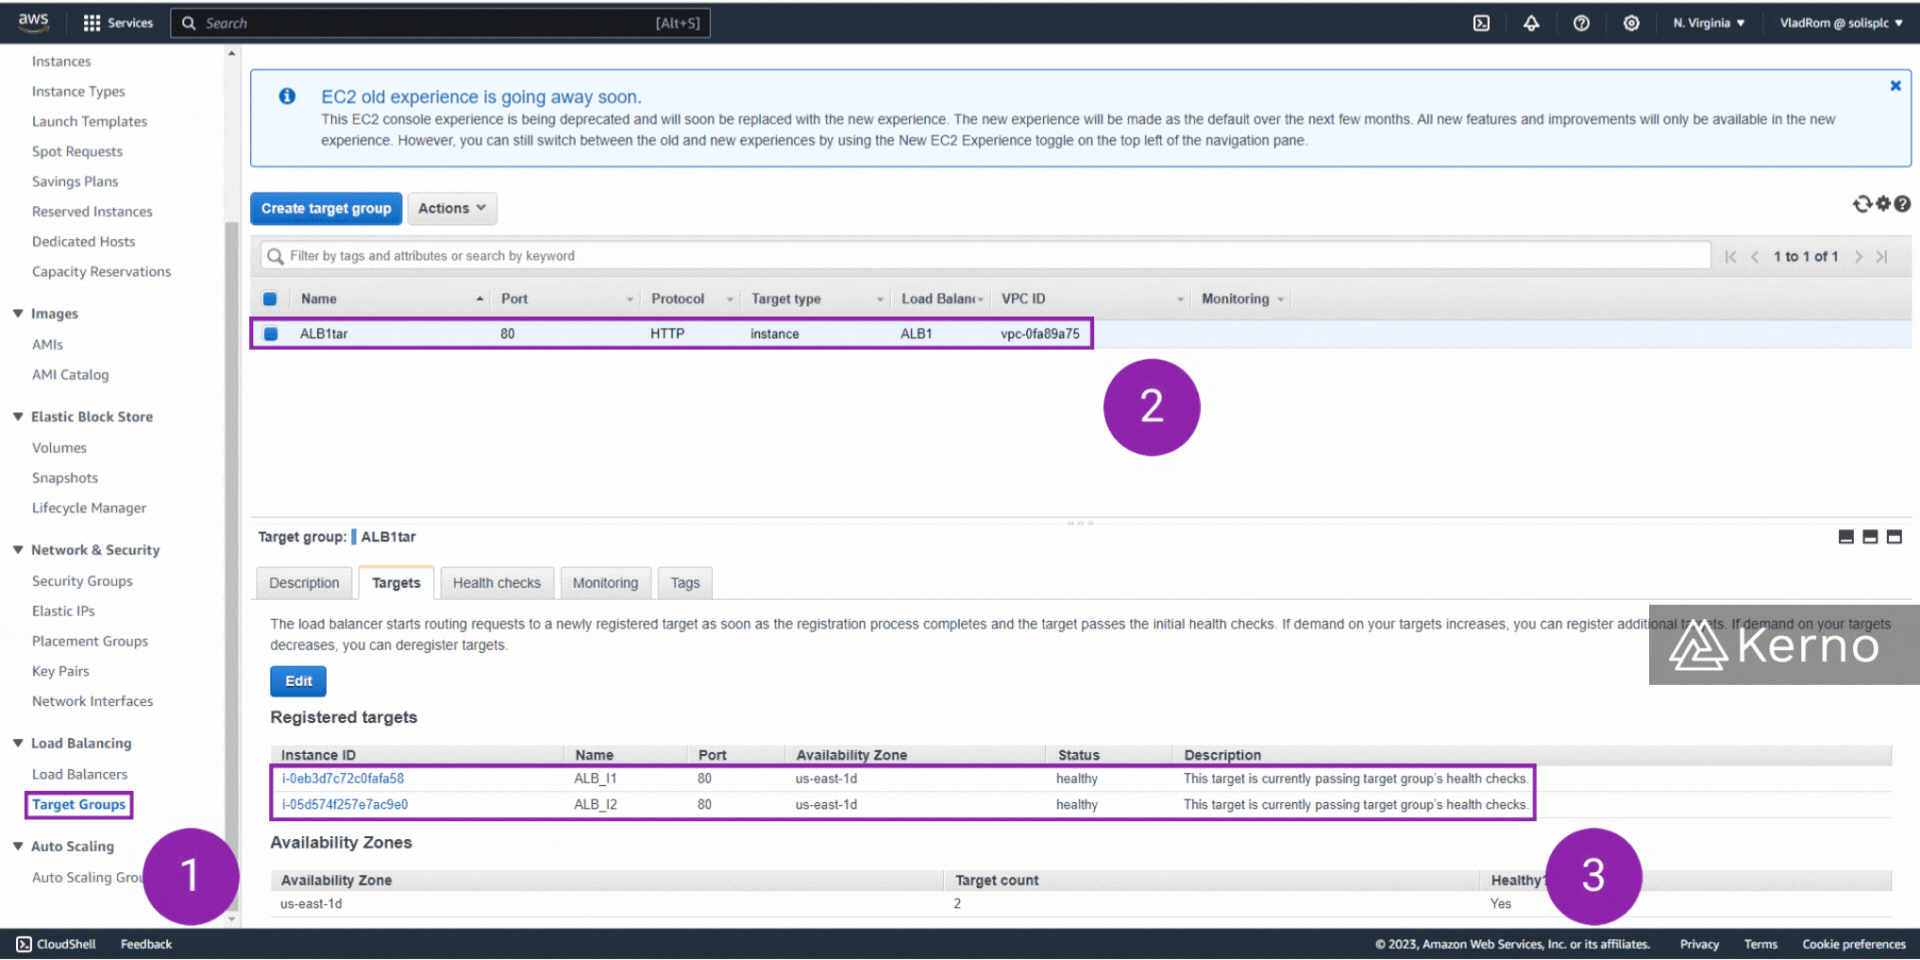
2.1 - From the Left Sidebar, select “Target Groups.”
2.2 - From the Target Group list, select the target group we specified during the ALB creation process.
2.3 - From the Targets tab, view the instances and validate that they’re labeled as “healthy.”
Frequently Asked Questions
What is an application load balancer?
An application load balancer serves as the main entry point for client traffic. It is used to intelligently direct the traffic that is comes into the application toward services and containers that process the traffic and serve up the output to the client.
What is difference between application load balancer and network load balancer?
At a high level, both load balancers accomplish the same general goal. However, per the OSI model, there's a clear distinction between different layers and there's a fundamental difference between directing traffic at the network and application layer. Network balancers would typically direct traffic at the switch / router level which means that the balance is made before any "software" on the application side is reached.
When should I use an application load balancer?
Application Load Balancers (ALBs) are part of most modern architectures. They're used to direct traffic in case of unpredicted loads, in verticals / applications where traffic fluctuates continuously, and as a general safeguard of most systems.
What is the advantage of ALB?
- Layer 7 Routing | ALB operates at Layer 7 of the OSI model, allowing it to route traffic based on application-level information such as HTTP headers, URLs, and request contents. This enables advanced routing features like path-based routing, host-based routing, and routing based on HTTP methods.
- Flexible Target Groups | ALB supports multiple target groups, allowing you to route requests to different sets of targets based on rules defined at the application level. This flexibility is useful for deploying microservices architectures, where different components of an application may have distinct routing requirements.
- HTTP and HTTPS Support | ALB natively supports HTTP, HTTPS, WebSockets, and HTTP/2 traffic. It can handle SSL termination, decrypting HTTPS requests and forwarding them to targets over HTTP if necessary.
- Content-Based Routing | ALB allows you to define routing rules based on the content of HTTP requests. For example, you can route requests containing "/api" to a set of backend servers handling API requests, while requests for static assets can be directed to another set of servers.
- Integration with AWS Services | ALB integrates seamlessly with other AWS services such as AWS Certificate Manager (ACM), AWS CloudFormation, AWS Auto Scaling, AWS Identity and Access Management (IAM), and AWS CloudWatch, providing a comprehensive solution for managing and scaling your applications.
- Centralized Logging and Monitoring | ALB provides detailed access logs and metrics through integration with AWS CloudWatch, allowing you to monitor and analyze traffic patterns, troubleshoot issues, and optimize performance.
- High Availability and Scalability | ALB automatically distributes incoming traffic across multiple Availability Zones to ensure high availability and fault tolerance. It scales automatically to handle varying levels of traffic without manual intervention.
- Security Features | ALB offers various security features such as SSL/TLS termination, client authentication, and integration with AWS Web Application Firewall (WAF) for protecting against common web exploits and attacks.
Is ALB free in AWS?
Yes, an Application Load Balancer (ALB) is free in AWS. However, an ALB isn't going to be a standalone service as it requires targets to redirect traffic to. In other words, there's no benefit in creating instances of ALBs without underlying targets which cost money. Keep in mind that you're likely to have "more" infrastructure when load balancers are involved - instead of having one EC2 instance; you're likely to have multiple. You gain stability in exchange of higher cost.
Which load balancer is mostly used?
As of 2024, the top five load balancer technologies based on market share are:
- AWS Elastic Load Balancer (ALB/NLB): Leading the market with a commanding 75.22% share and boasting 37,581 customers, AWS Elastic Load Balancer offers both Application Load Balancer (ALB) and Network Load Balancer (NLB) services, providing advanced routing capabilities, high availability, and seamless integration with other AWS services.
- Citrix ADC: Holding a significant 10.00% market share with 4,995 customers, Citrix ADC (formerly known as NetScaler ADC) is a comprehensive application delivery controller that provides load balancing, application acceleration, security, and other features for optimizing application performance and availability.
- HAProxy: Securing 8.25% of the market with 4,122 customers, HAProxy is a popular open-source load balancer known for its high performance, reliability, and flexibility. It offers Layer 7 load balancing capabilities and is widely used in various deployment scenarios, including web servers, microservices architectures, and containerized environments.
- F5 BIG-IP Platform: With a 3.95% market share and 1,974 customers, the F5 BIG-IP Platform is a suite of application delivery services offered by F5 Networks. It provides advanced traffic management, security, and application optimization features, catering to large enterprises and complex network environments.
- Google Cloud Load Balancing: Holding a 1.95% share with 973 customers, Google Cloud Load Balancing is a fully managed service provided by Google Cloud Platform (GCP) for distributing incoming network traffic across multiple instances or backend services. It offers global load balancing, SSL termination, and autoscaling capabilities.
These top load balancer technologies cater to a wide range of industries and use cases, providing essential infrastructure components for ensuring application availability, scalability, and performance in modern IT environments.
Conclusion on Application Load Balancers [ALB] in AWS
At this point, we’ve deployed two EC2 instances and an application load balancer that will direct the incoming traffic to one of the instances. In order to “see” the example work, navigate to the load balancer DNS name you’ve copied above. What you should see, if everything is working correctly, is a web page that will display the IP address of the EC2 instance that you’ve reached. Refresh the page to see a different IP address (one or the other). Note that you can simulate the “crash” of an instance by stopping it, at which point the load balancer will cease receiving the “healthy” check for that instance and redirect the traffic to the correct instance that is still running. Advanced users can choose to utilize the power of Amazon Elastic Beanstalk to launch their applications and services that will include an application load balancer as part of the infrastructure.